In the last installment of the vSphere 5.5 series we installed the SSO service. Now that the Java JRE is installed (via the SSO installer), we have the tools ready to create our vCenter SSL certificates via an online Microsoft CA. If you don’t have an online Microsoft CA that can issue your VMware SSL certificates, skip this section and go to Part 9 (coming soon), where we go through the manual process.
I’m recommending you create the SSL certificates now, so that you have a variety of methods at your disposal to use these certificates. VMware’s stance is that you fully install vCenter 5.5 with self-signed certificates then use their free certificate automation tool to replace all of the certificates as the last step. That is certainly a good route to go, and I would not dissuade you from that method. Or, you could also replace certificates as you install components so each layer is trusted as you go. Either way, I recommend the VMware certificate tool even if it is a bit primitive. It is flexible enough to let you incrementally replace certificates.
In order to make life easier for installers I’ve written a “toolkit” PowerShell script to help with the SSL process. More details are below, but I would like to give credit to Chrissy LeMaire for some of the (modified) building blocks of this script. She wrote a vCenter 5.1 PowerShell SSL replacement script that was more automated than VMware’s batch script. My script does not replace VMware’s automation tool, but helps you prepare the files it needs.
Blog Series
SQL 2012 AlwaysOn Failover Cluster for vCenter
vSphere 5.5 Install Pt. 1: Introduction
vSphere 5.5 Install Pt. 2: SSO 5.5 Reborn
vSphere 5.5 Install Pt. 3: vCenter Upgrade Best Practices and Tips
vSphere 5.5 Install Pt. 4: ESXi 5.5 Upgrade Best Practices and Tips
vSphere 5.5 Install Pt. 5: SSL Deep Dive
vSphere 5.5 Install Pt. 6: SSL Certificate Template
vSphere 5.5 Install Pt. 7: Install SSO
vSphere 5.5 Install Pt. 8: Online SSL Minting
vSphere 5.5 Install Pt. 9: Offline SSL Minting
vSphere 5.5 Install Pt. 10: Update SSO Certificate
vSphere 5.5 Install Pt. 11: Install Web Client
vSphere 5.5 Install Pt. 12: Configure SSO
vSphere 5.5 Install Pt. 13: Install Inventory Service
vSphere 5.5 Install Pt. 14: Create Databases
vSphere 5.5 Install Pt. 15: Install vCenter
vSphere 5.5 Install Pt. 16: vCenter SSL
vSphere 5.5 Install Pt. 17: Install VUM
vSphere 5.5 Install Pt. 18: VUM SSL
vSphere 5.5 Install Pt. 19: ESXi SSL Certificate
…possibly more to come…
Derek’s Toolkit Script
The PowerShell script performs several tasks and is menu driven. It’s an all in one script, meaning it handles online/offline CAs, and will also do other install tasks like create your ODBC connectors. That functionality is not yet in there, but will be added in the coming weeks. The full feature list will change and so will the menus. But I’ll try and keep this updated as often as I can.
The CSRs are in strict accordance with VMware KB articles regarding certificate requirements, including an optional IP address in the SAN field. I want to strictly color within the KB article lines, so if you do use this script and then have to call up VMware support they won’t roll their eyes and have you re-do your certs because some blogger got it wrong.
The script has the following features:
- Downloads and installs the proper version of OpenSSL if it’s not already installed
- Creates 2048 bit RSA private keys in the proper format
- Creates a directory for each service bundle of SSL certificates
- Generates seven OpenSSL configuration files, one for each certificate, in the appropriate directory
- Downloads both root and subordinate root public certificates
- Submits the CSRs to the online CA and downloads the certificates
- Creates the needed service PEM files for the vCenter certificate automation tool
- Creates the required root/subordinate PEM files
- Handles the special SSO 5.5 certificate requirements
- Does NOT require PowerCLI
- Assumes all vCenter components are on one server
- Automatically uses the hostname of the server you run the script on for all certificates
- Creates a pre-filled vCenter Certificate Automation environment script – Just run!
- Works with offline CAs
- Creates SSO 5.5 certificate replacement files – Only used if manual replacing certs
- Creates customized SQL vCenter and VUM database creation script
- Creates SQL ODBC DSNs for vCenter and VUM
- Automatically downloads and installs SQL 2008 R2 or SQL 2012 client package
- Linux vCenter Server Appliance support for online minting and offline CSR creation
- Creates certificates for Auto Deploy, Dump Collector, Syslog collector, Authentication Proxy
- Support Microsoft CAs that require manual certificate approval
- Requires PowerShell 3.0 or higher
Toolkit Change Log
v1.56, January 19, 2014
- Fixed bug when no subordinate CA was present
- Changed Microsoft “renewal” default to 0 for root/sub CA
v1.55, January 12, 2014
- Added additional CA/subordinate error checking
v1.50, December 22, 2013 Changes:
- Added support for ESXi hosts
v1.42, December 3, 2013 Changes:
- Modified how the certificate hash files are created
- Added Authentication Proxy certificate creation
- Changed MS CA download parameter Renewal from 0 to 1
v1.41, Nov 14, 2013 Changes:
- Changed the root/intermediate CA download order and added more error checking
v1.4, Nov 10, 2013 Changes:
- Added Auto Deploy, Dump Collector and Syslog Collector SSL certificates
- Added support for manually approved CA certificates (Windows & Linux)
- Added SHA512 request in CSR
- Added request for vCenter FQDN in Option 3
Special thanks to Ryan Bolger from Trace3 for the CA manual approval code.
Online SSL Minting
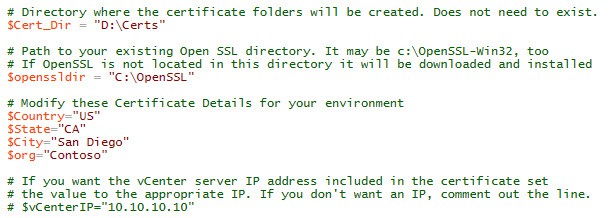
1. Download my vCenter 5.5 toolkit script from the links above. Open it in the PowerShell ISE (or favorite editor). The PowerShell script requires a few variable modifications before you run it. In the first block of variables you need to setup the directory where you want all of the certificates to go. If OpenSSL is already installed, change the path so the script knows where the root directory is. If that directory does not exist OpenSSL will be downloaded and installed for you. Next up are the certificate properties. Change those to suite your environment. If you want the server’s IP address in the SAN field, then uncomment the line and change the IP.
2. The script is semi-intelligent about using only a root, or one subordinate and root. Simply comment out $SubCA with a # if you only have an online Microsoft root CA. If you have two or more subordinates, then you will need to follow VMware SSL KBs or modify my script. Sorry!
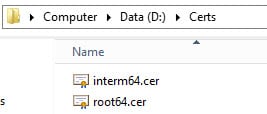
If for some reason the script can’t download your CA certs automatically, try changing the download protocol. The default is HTTPS. If that still fails, you can manually place the Base-64 encoded root (and intermediate) certificates into your $Cert_Dir path. The root should be called Root64.cer and the intermediate called interm64.cer.
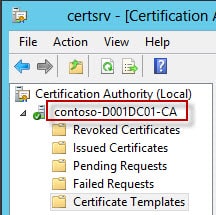
3. The next section are the details for your issuing CA and the template. The issuing CA is your online CA that will actually mint your certificates. If you only have one CA, then clearly that is what you should use. The $ISSUING_CA field can be a little tricky. The first field is the shortname (or FQDN) of your CA (e.g. d001dc01). Next up is your CA name. This can be anything, so you must open the Certificate Authority MMC on your CA to find out what it’s called. As you can see from my screenshot below my CA name is contoso-D001DC01-CA.
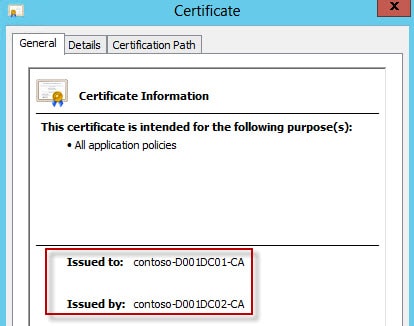
Now if you don’t have MMC access on the CA to look up the actual CA name, then you can find it another way. Open a browser and go to https://yourCAserver.domain.com/certsrv and select Download a CA certificate, certificate chain, or CRL. Select Download CA Certificate Chain. Open the files, then open the certificate(s) in the file. Now depending on how your CAs are setup, it may take a little thought to correlate the “Issued to” and “Issued by” to your root/subordinate CA. In my case contoso-D001DC02-CA is my root CA, and contoso-D001DC01-CA is my subordinate. I want my VMware certs issued from the subordinate, so just like the MMC screenshot above, the CA name that corresponds to D001DC01 is contoso-D001DC01-CA.
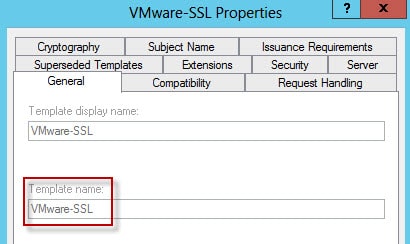
4. Next up is the template name. This can also be any value, but if you followed my guide then it will be called VMware-SSL. This is the Template Name not the Template display name.
5. Your account must have the required CA permissions to enroll for the VMware-SSL template. If it does not, then find a CA administrator, have them logon the vCenter server and run the script. If your online Microsoft CA is configured for manual certificate approval, you can still use Option #1.
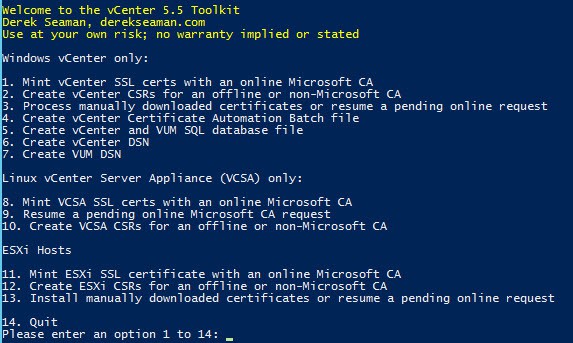
6. Since you have properly configured the script variables and have one or more online Microsoft CAs, you should select option 1. New to v1.3 and later it will ask you to confirm your vCenter FQDN. If the FQDN is correct, just press ENTER. If it is wrong, just enter the right FQDN.
After confirming/entering your FQDN the process is automated. If you do get errors, then you either goofed up the variables, have insufficient permissions, or my script is broke and needs fixing. If its broke, now is an excellent time to learn PowerShell. Script is provided as-is, and bugs/issues may or may not be fixed.
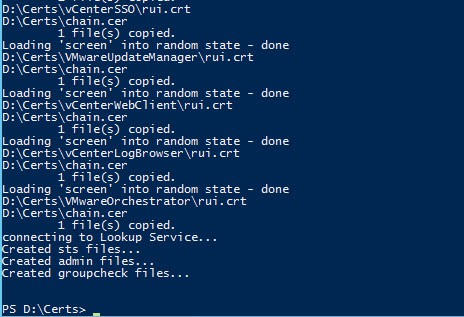
Below is a screenshot with a sample of the script output as it runs using an online CA with automatic approval. A lot more has scrolled off the screen, but you get the idea. There is limited error checking, but subtle issues could fly by on the screen. Review the output for any issues.
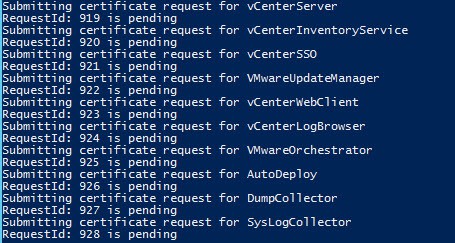
7. If your CA is configured for manual approval you will get a list of the request IDs for all 10 certificates. Have your CA administrator approve the requests, then run Option #3 to complete the process. You will only see the Request IDs when manual request approval is required. When you run Option #3 the output should look like the previous screenshot.
Output Validation
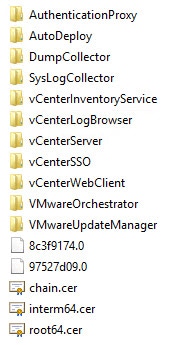
1. When the script completes you should have eleven directories, and either one or three certificate (.cer) files in the root of your working directory. If you have a subordinate CA then you will have three files. If you have a single CA you will only have a Root64.cer file. The two files with funny names are hash files of the root and intermediate CAs. If you only have a root CA you will see a single hash file.
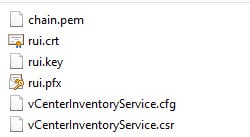
2. If you take a peek inside one of the folders you will see a series of files. Each service, except SSO, will have the same set of files (except the .csr and .cfg with are uniquely named). The
- chain.pem: Used for the VMware vCenter certificate automation tool
- rui.crt: Public half of your SSL certificate
- rui.key: Private half of your SSL certificate
- rui.pfx: Combined private and public SSL keys
- *.cfg: Certificate signing request file
- *.csr: Certificate signing request
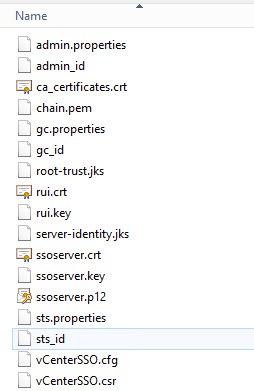
3. In the vCenterSSO you will see a plethora of files. Depending on how you replace your SSL certificates, you may only use some of these files. But to help you out as much as possible, all the SSO files that are tedious to create manually are created for you. If you are missing files, then something went wrong. Please match up all filenames to validate the toolkit script worked. Some files are copies of each other, but they are needed to avoid confusion and more easily follow the KBs.
- *.properties: Use for manual SSO SSL replacement
- *_id: Use for manual SSO SSL replacement
- ca_certificates.crt: Use for manual SSO SSL replacement
- root-trust.jks: Used for SSO/STS certificate validation
- server-identity.jks: Same file as above with a different name (per VMware KBs)
- ssoserver.p12: Same functionality as rui.pfx, but VMware changed the name and format for SSO 5.5
- ssoserver.crt: Copy of chain.pem
- ssoserver.key: Copy of rui.key
Certificate Validation
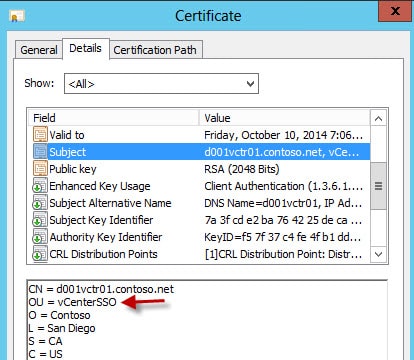
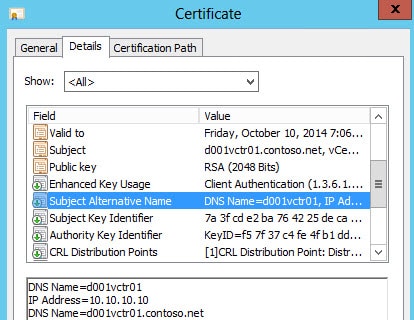
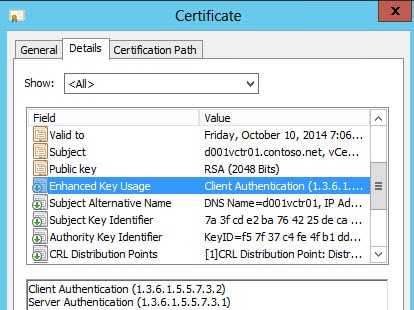
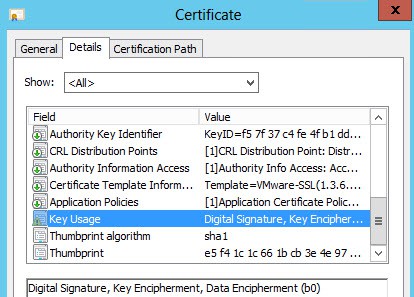
Now that your certificates are minted, let’s quickly validate all of the properties are present. Some users have reported corrupted/incorrect root and subordinate certificates, so please do NOT skip this section. Also, even if your CSR requests a property (such as client authentication), that doesn’t mean your CA will honor it. The OU in each subject name should be unique and match the directory its in.
The Subject Alternative Name should contain the short name and FQDN. Optionally it can contain your IP address too.
Enhanced key usage should show server and client authentication. Client authentication can be missing if the CA template is wrong.
Key usage should contain digital signature, key encipherment and data encipherment.
We also need to validate that the root and intermediate certificates are in the right format. Some users have reported corrupted root or intermediate certificates. In Notepad open both your root64.cer and interm64.cer files. They should both start with —–BEGIN CERTIFICATE—–. If they contain HTML or any non-printable characters, then they are corrupted or in the wrong format. STOP, as they will most certainly NOT work.
If your root or subordinate CA certs contain HTML, and you are using the script to automatically download them from a Microsoft CA, I have a suggestion that may work. Locate the code snippet below and change Renewal=1 to Renewal=0. That tweaks how the script downloads the certificate from the Microsoft CA. In addition, if the script downloads an old subordinate certificate, change renewal=0 to renewal=1 in the DownloadSub function.
Summary
Assuming you have an online Microsoft CA and you were successful in running the script, you now have all of the files needed to use the VMware certificate automation tool, or go through the manual certificate replacement process. In Part 9 I cover how to use an offline or non-Microsoft CA. At the end of that article you will have exactly the same files as you do from this installment. Starting in Part 10 we will resume our configuration and installation of vCenter components.







Hi Derek! got this error: unable to write 'random state' writing new private key to 'C:OpenSSLcertsvCenterLogBrowserrui-orig.key' —– OpenSSL : writing RSA key At E:zertvsphere_5_5_ssl_certs_req.ps1:251 char:6 + OpenSSL rsa -in "$Cert_Dir$Servicerui-orig.key" -out "$Cert_Dir$Service … + ~~~~~~~~~~~~~~~~~~~~~~~~~~~~~~~~~~~~~~~~~~~~~~~~~~~~~~~~~~~~~~~~~~~~~~~~~~~~~~~~ + CategoryInfo : NotSpecified: (writing RSA key:String) [], RemoteException + FullyQualifiedErrorId : NativeCommandError OpenSSL : Loading 'screen' into random state – done At E:zertvsphere_5_5_ssl_certs_req.ps1:250 char:9 + OpenSSL req -new -nodes -out "$Cert_Dir$Service$Service.csr" -keyout " … + ~~~~~~~~~~~~~~~~~~~~~~~~~~~~~~~~~~~~~~~~~~~~~~~~~~~~~~~~~~~~~~~~~~~~~~~~~~~~~~~~ + CategoryInfo : NotSpecified: (Loading 'screen…om state – done:String) [], RemoteException + FullyQualifiedErrorId : NativeCommandError Generating a 2048 bit RSA private key tried serveral directorys / ntfs /… Read more »
Marcel, did you find out what was causing this issue? I am getting the same errors.
Thank you,
Hello
in my case i noticed that even if i specified as openssl path e:openssl it keeps to installa on C: using silent setup set in the script.
Please try changing c:openssl it solved in my case
I found that if i ran the powershell script as administrator I did not receive this error
Hi this error happens because openssl needs to write its state information to a file that it cant get write access to. By default though it should go to c:rnd. This error shouldnt stop the certs from being produced.
I'm getting an error:
The parameter is incorrect. 0x80070057 (WIN32: 87)
not sure what I can do from here as the code looks correct.
I got the same error message if I wrote the wrong CA "instance" name in the script: $ISSUING_CA = "ca-server-hostnamewrong-ca-instance-name". The problem is finding the CA "instance" name which typically is "domain-servername-ca" but many places do change this name I have seen. I've just verified this again by testing with the wrong CA name in my environment and the error is then the same each time. Sometimes like in my work environment you won't have RDP access on the CA server and it is not always easy to get the correct CA name information. This is how you can get… Read more »
Excellent tip. I'll update the post.
Thanks, I've updated the blog post with that tip.
Did you ever figure out what was causing this error?
I'm getting this output: http://postimg.org/image/mm7snuk2h/
Can you help me? Or give me any idea what's wrong…
I figured it out! 🙂 my $Country="US" and $State="CA" were too long 🙂
If the $ISSUING_CA name is NOT the FQDN of the server ( which it should not be for security reasons) this script fails as certreq.exe is unable to find the CA in question. This can be fixed by amending the following argument lines ; # submit the CSR to the CA $psi.FileName = "certreq.exe" $psi.Arguments = @("-submit -attrib `"$Template`" -config `"$ISSUING_CA`" -f `"$Cert_Dir$Service$Service.csr`" `"$Cert_Dir$Servicerui.crt`"") … # retrieve the signed certificate $psi.FileName = "certreq.exe" $psi.Arguments = @("-retrieve -f -config `"$ISSUING_CA`" $reqID `"$Cert_Dir$Servicerui.crt`"") insert $rootCA in the argument lines … $psi.Arguments = @("-submit -attrib `"$Template`" -config `"$rootCA$ISSUING_CA`" -f `"$Cert_Dir$Service$Service.csr`" `"$Cert_Dir$Servicerui.crt`"") … $psi.Arguments… Read more »
Issuing CA should be what goes in the "ConfigString" of certutil.exe.
If your CA as stated above isn't a FQDN, use 'Certutil –Dump' to find all of your AD CA and use the config line as your issuing_CA.
when that issuing CA is not correct and you try to mint with an online CA I received an RPC error pop-up warning in the script.
Thanks for this excellent work. I followed the entire procedure and everything works fine!!! I adopted the instructions/script slightly to our environment, perhaps this information is useful for others as well: * I changed the validity period of the CA to a larger value than the default (two years) as well as the custom certificate template, so this procedure doesn't have to be repeated bi-yearly. * I changed the Toolkit script to add three more SAN's, one for DNS:localhost, one for DNS:127.0.0.1 and one for IP:127.0.0.1. This way the hostname, FQDN, localhost, IP address and loopback address are all part… Read more »
Derek so looking through all the posts it appears that there is no section for updating the vCenter Orchestrator or the Log Browser SSL Certificates even though those appear to be part of the vCenter Server component install and not support tools which are optional.
Is there a reason that you did not mention replacing these in the sections of this series?
Hello, Derek! I got porblems using you script, may be you could help me: 1. i have root ca and sub ca, but if i enter values fot both of them in your script, there is request on root ca, not on sub ca, why is it going like that? 2. if i put in $rootCA my sub ca as a value, or just comment (#) the $rootCA (tried both), i got 2 certs downloaded, but also got message: Invalid subordinate certificate format. Validate BASE64 and try again. After this i can see properties of only one cert (root64) and… Read more »
Any update on this? I just received this too when working on generating certs for an appliance.
Following up to my follow-up: Looks like I had to also change the sub CA to "Renewal=0" instead of "Renewal=1" around line #317. Why this has worked countless times before without (extra) modification is beyond me. Looks like my CA started drinking the koolaid this go around.
I have updated certificate details, vCenter IP, root CA name and $ISSUING_CA to CA server host name. Then try to run the script from PS command Promot. I get following error. [D] Do not run [R] Run once [S] Suspend [?] Help (default is "D"): R C:installToolkit-55.ps1 : A positional parameter cannot be found that accepts argument '-'. At line:1 char:1 + ./Toolkit-55 – U2 + ~~~~~~~~~~~~~~~~~ + CategoryInfo : InvalidArgument: (:) [Toolkit-55.ps1], ParameterBindingException + FullyQualifiedErrorId : PositionalParameterNotFound,Toolkit-55.ps1 Not sure why. I doubt the input I mentioned for $ISSUING_CA is wrong?. I have opened Certificate Autharity MMC from CA server… Read more »
Has this CA server been in production or was it just built recently?
If you are following this series of articles, you already have the needed CA certificates in your C:Certs directory: root64.cer, and perhaps iterm64.cer, and perhaps another intermediate CA certificate, should you happen to have a three-tiered CA hierarchy. After backing up C:Program Files (x86)HPHP Insight Control for vCenter Javalib security cacerts, first add your root CA certificate using the Java Key and Certificate Management Tool as follows:
keytool -importcert -alias myrootca -file root64.cer -noprompt -storetype JKS -keystore cacerts -storepass change it. All these avail on http://offlinefiles.net
I was wondering if the Toolkit was still available. The download link seems to be broken.
Yes..the link should be working. vexpert.me/toolkit55 works.
Hi Derek sorry to bother you, is the link still available?
thanks,
Yes the download link still works.
I didn't have "ca_certificates.crt" after running the script. Looked at existing 5.1 install and couldn't find a reference to it there either.
Any foreseeable issues using RSA 4096 for key length?
I think RSA 4096 is OK, but haven't personally tried it.
Does this script only work if vCenter in installed in simple mode?
I have SSO, Inventory, webserver and vCenter all installed on separate VMs…..
Thanks.
Chris
No, but what the script does check for is SSO components so that it can create the Java keystores. So if you run the script on your SSO server, it should pass those checks. Let me know how that goes.
The root64.cer it places in c:certs is an expired cert. On our CA there are 2 CA certificates: Certificate #0 (expired) and Certificate #1.
Looks like it's using Certificate#0 when creating root64.cer.
I tried removing the expired cert but then the script fails right away writing an invalid and unreadable root64.cer.
Anyway to use Certificate#1 instead?
Locate the 'Function DownloadRoot' section in the script and change the download URL parameter Renewal to a 1 and see what that does for you.
After running option 8, I seem to be missing a couple of files in each directory. I do not see the chain.pem or rui.pfx files. I see the others in the directories. in the root of the directory I have the root64.cer
After running option 8, I seem to be missing a couple of files in each directory. I do not see the chain.pem or rui.pfx files. I see the others in the directories. in the root of the directory I have the root64.cer I did get one of these for each type of cert writing new private key to 'C:Certs-vcenter2VMware vSphere Autodeploy Service Certificaterui-orig.key' —– OpenSSL : writing RSA key At C:Certs-vcenter2vcenter2-certs.ps1:319 char:6 + OpenSSL rsa -in "$Cert_Dir$Servicerui-orig.key" -out "$Cert_Dir$Service … + ~~~~~~~~~~~~~~~~~~~~~~~~~~~~~~~~~~~~~~~~~~~~~~~~~~~~~~~~~~~~~~~~~~~~~~~~~~~~~~~~ + CategoryInfo : NotSpecified: (writing RSA key:String) [], RemoteException + FullyQualifiedErrorId : NativeCommandError Submitting certificate request for VMware… Read more »