Yes, time for part 2 of the Wyse PXE booting series. Part 1 described the general concept and why you might want to PXE boot your Wyse zero client instead of having embedded flash for the ThinOS. The remainder of this post will cover the technical details on how to configure your DHCP and TFTP server to enable the Wyse device to PXE boot. These instructions assume you are using Windows Server 2008 R2. It will work with previous operating systems, but some of the steps may be different.
My environment is configured as follows:
DHCP/TFTP server: 192.168.0.10
Wyse PXE boot strap file: VL10_PXE (get from your Wyse rep)
IIS Configuration folder for Wyse file: inetpubwwwrootConfig-A
1. Install the DHCP server role and configure a scope during the install process. Be sure to use a valid IP range and subnet mask.
2. In the DHCP console, right click on IPv4 and click on Set Predefined Options. You need to configure two options, 161 and 162. I used the following parameters:
—
Name: Wyse File Server
Data type: String
Code: 161
Description: Wyse File Server
—
Name: Wyse File Path
Data type: String
Code: 162
Description: Wyse File Path
—
3. Right click on Server Options and select Configure Options. Now the values you input will depend on your environment. But, you must configure 66, 67, 161 and 162 for it to be successful. Examples are shown below:
66: 192.168.0.10
67: VL10_PXE
161: http: //192.168.0.10
162: /Config-A
4. Install IIS with minimal features: Static content, HTTP logging, Request filtering, IIS Management Console.
5. Add a MIME type to IIS for the .ini extension and use a MIME type of text/plain.
6. Create a directory under your wwwroot directory called Config-A. Make a sub-folder called Wyse, and under that a folder called wnos (i.e. wwwrootConfig-Awysewnos).
7. Copy your wnos.ini file to the wnos directory. This ini file is one you create per the Wyse configuration guides and is unique to your environment. If everything is working you can open IE and browse to http: //localhost/Config-A/wyse/wnos/wnos.ini and you should get a download prompt.
8. Install Windows Deployment Services (WDS) but only select the Transport Server feature.
9. Create a directory D:WDSWyse and copy your VL10_PXE and VL10_wnos files to it. You can only obtain these files from your Wyse rep.
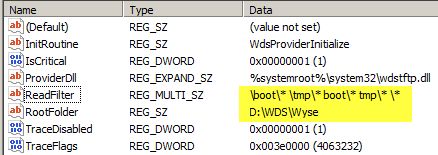
10. Navigate to HKLMSystemCurrentControlSetservicesWDDServerProvidersWDSTFTP. Open the ReadFilter key and add * to the bottom of the list. Change the RootFolder path to D:WDSWyse.
11. Start or restart the WDS service. Now if you turn on your Wyse zero client, it should pick up a DHCP address, download ThinOS, then get your config file. If something doesn’t work, I’ve found Wireshark to be extremely helpful.


hi Derek i followed your instructions but im shorting of the vl10_XPE can you help me getting it. Thankx
Domingos
Well the file does exist. Keep trying with a different rep.