One of the continuing pain points with VMware vSphere is the unnecessarily complicated procedure to install trusted SSL certificates in ESXi, vCenter and VUM. Up until 4.1 Update 1 (released 2/10/11), VMware had no public procedures to update the VUM SSL certificate, over 1.5 years after vSphere 4.0 hit the streets. Plus I’ve found that even the published procedures for ESX(i) and vCenter were convoluted and incomplete.
So over the last couple of years I’ve written several blogs about how to replace your ESXi, vCenter and VUM certificates. VMware made a little progress with VUM 4.1 Update 1, in that they now have a GUI utility that performs the behind-the-scenes reconfiguration of VUM to use a new SSL certificate. This new tool is called VMware Update Manager utility and does more than just update your VUM SSL certificates. You are still left with a painful process for ESXi and vCenter, so maybe in vSphere 5.0 VMware will wake up and provide a more streamlined procedure.
Even with the new tool in 4.1 U1, I found the associated KB article less than helpful and even tells you to leverage openssl on an ESX (not ESXi) host to generate new self-signed certificates. The second half of their article has instructions for using a trusted commercial CA certificate, but they still have you leveraging ESX to generate the certificate requests. This boggles my mind for several reasons:
1) ESX 4.1 is the last release and is a dying code branch. VMware has stated ESXi is the future and the only option in vSphere 5.0.
2) OpenSSL is not included in ESXi so you can’t follow the KB article if you only run ESXi . Why publish a KB article that doesn’t apply to organizations that only use ESXi?
3) OpenSSL is open source and widely available for free for many platforms including Windows. vCenter and VUM only run on Windows, so it makes a lot more sense to have customers download Windows OpenSSL and generate the certificates on a Windows computer.
4) Even if you have ESX, VMware always lags in incorporating the latest version of OpenSSL into ESX, so you could be using a version with known vulnerabilities.
I’m not trying to bash VMware, but come on guys, please get with the program. As a testiment to the SSL problems VMware has not addressed, my SSL blog posts get alot of hits. Until VMware “gets it right” I’ll continue to help the community at large. So to that end, let’s get on with how to update VUM SSL certificates in VUM 4.1 U1.
1. Download OpenSSL Windows binaries here. I recommend the full v1.0.0c package. Install OpenSSL using all default values on any Windows computer. I put OpenSSL on my vCenter server since I need it for ESXi and vCenter SSL certificate generation.
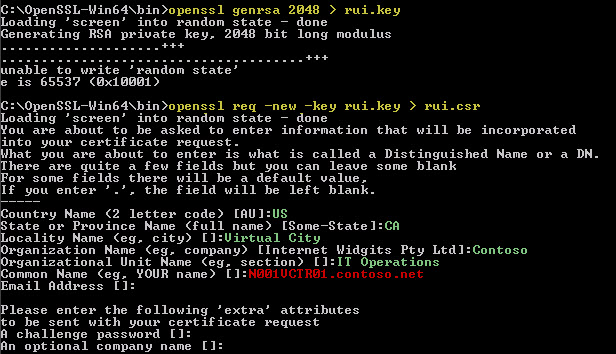
2. Generate a 2048-bit RSA private key (you could use 1024 bit as well, but I like stronger keys):
openssl genrsa 2048 > rui.key
3. Create a certificate request based on the previously generated private key:
openssl req -new -key rui.key > rui.csr
For the certificate request parameters (in green) use the values appropriate for your organization. The critical parameter, the common name (in red), should be the FQDN of your VUM server. Do not use a challenge password.
4. At this point you have a valid certificate request and you can submit it to a commercial CA, or your internal trusted CA. For the purposes of this article I will leverage a 2008 R2 Microsoft CA, so some steps may vary if you use a commercial cert.
5. Use NotePad and copy the contents of rui.csr to the clipboard.
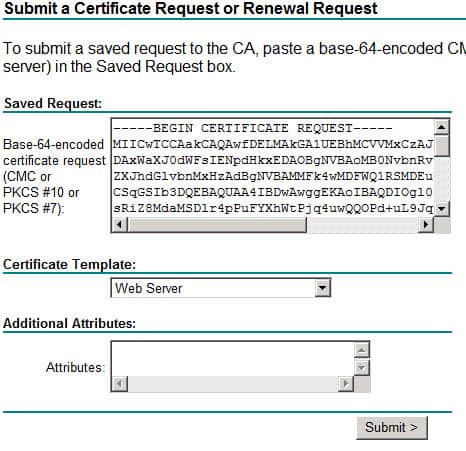
6. Navigate to your Microsoft CA, click on Request a certificate, click advanced certificate request, click Submit a certificate request by using a base-64-encoded CMC….
7. On the Saved Request screen paste the contents of the clipboard, and change the certificate template to Web Server (or your organization’s web server template name).
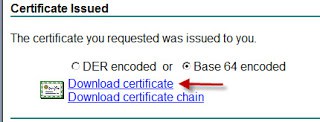
8. Submit the certificate request and download it as base-64 encoded WITHOUT the certificate chain, and save it with a filename of rui.crt.
9. Type the following command (and use a blank password when prompted):
openssl pkcs12 -export -in rui.crt -inkey rui.key -name rui -out rui.pfx
10. Stop the VMware vCenter Update Manager service.
11. Backup the existing VUM certificates located your VUM directory, by default it’s :
C:Program Files (x86)VMwareInfrastructureUpdate ManagerSSL.
12. Copy your new rui.crt, rui.key and rui.pfx files to the SSL directory above, replacing the existing files.
13. Navigate to C:Program Files (x86)VMwareInfrastructureUpdate Manager and launch VMwareUpdateMangerUtility.exe. Login with your vCenter administrator credentials.
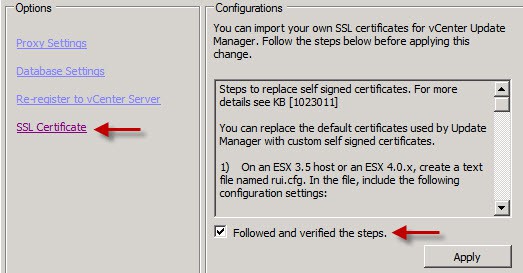
14. Click on SSL certificate then check the box under the instructions and finally click Apply.





Hi, Magnus. Here’s a VMware KB article that may be relevant to your concern: “VMware Update Manager network port requirements” at http://kb.vmware.com/selfservice/microsites/search.do?language=en_US&cmd=displayKC&externalId=1004543.
It appears that if Update Manager is running on the vCenter server itself, then a separate SSL certificate for Update Manager may not be needed at all because of the reverse proxy by vCenter server through port 443.
Anyway if you want to reuse the vCenter certificate, then copy rui.key and rui.crt, and regenerate rui.pfx (step 9 above) with no export password.
Regards, Jeff.
Don’t forget that you have to clean out the information in the beginning of the rui.crt file. Clean out everything upto the —–BEGIN CERTIFICATE—– line or it will not import.
Step 9 references rui.crt. I get an error message that this file does not exist. Where should this file come from? I don’t see any other reference to rui.crt in these steps outside of step 9.
Whoops..had a typo! I fixed step #8.
Andres, I don’t have a script handy, but most anything can be scripted with enough effort. VMware is working on a SSL replacement tool that will help automate this process. But no idea when it will be released.