When using a load balancer in an enterprise environment it opens up the possibilities for service level redundancy that you may not have thought of before. For example, maybe you have appliance devices on the network that can be Active Directory integrated, but only allow you to specify one LDAP server (HP iLO, for example). Maybe you have multiple datacenters and you want to provide seamless datacenter failover in case of an outage for a service, such as a web site. Or maybe you have a global network and want to direct users from a particular region of the world to the nearest server to provide the best response times. Advanced load balancers can do all of this, and more.
Out of the box the Citrix NetScaler has a the capability to load balance LDAP requests, and also has intelligent monitors that do more than just see if the TCP port LDAP uses (389) is alive. The monitor can perform a query against the LDAP server to ensure the LDAP service is actually returning valid data. So let’s build a load balanced LDAP virtual server in the NetScaler and utilize the intelligent LDAP monitor provided by Citrix. A future blog article will cover the same configuration but for LDAP over SSL. These instructions are written using NetScaler v9.3, but should be fairly similar in other releases.
1. Create a service account in AD that will be used for the LDAP monitor. It should not have any special privileges. Let’s call ours SVC-NS-LDAP.
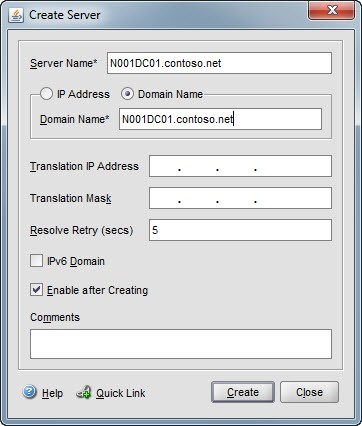
2. Open the NetScaler management GUI and open the Load Balancing folder. Go down to the Servers container and create a new server object. Enter a logical server name. I would use the FQDN of your first Active Directory server. Next you can enter the IP address or domain name of the server. I prefer using the domain name so if a server’s IP changes you don’t wonder why your monitor or load balanced service is broken. Click on Create. Repeat the process for your other AD servers.
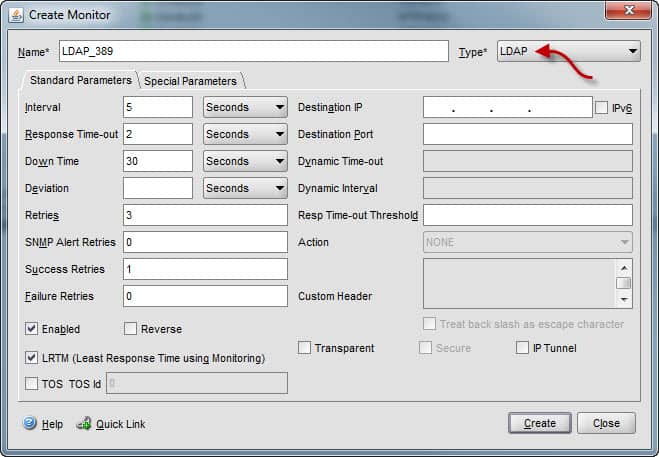
3. Under the Load Balancing folder on the NetScaler click on the Monitors container. Create a new monitor. On the first window enter a logical name, such as LDAP_389 and change the monitor type to LDAP. Leave all other parameters on this window alone.
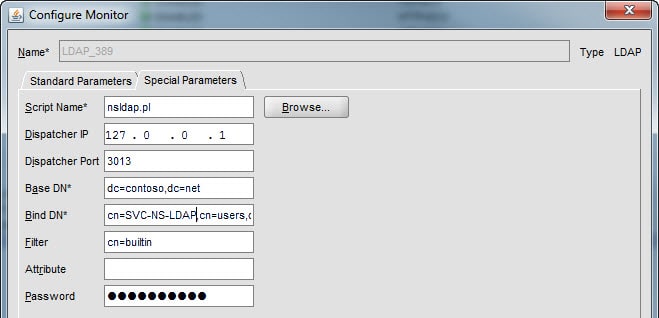
4. Click on the Special Parameters tab then click on Browse and locate the nsldap.pl script. For the remaining fields use:
- Dispatcher IP: 127.0.0.1 (Do not change this IP)
- Dispatcher Port: 3013 (Any unused NetScaler port will work but 3013 seems popular.)
- Base DN: dc=contoso,dc=net (Substitute your domain information of course.)
- Bind DN: cn=SVC-NS-LDAP,cn=users,dc=contoso,dc=net (Use your path.)
- Filter: cn=builtin (This is a standard object in AD.)
- Password: xxxxx (Enter the password of your service account)
Note that the filter parameter is very important so the LDAP server doesn’t return every object in your domain. You only need a single object to return from the query to ensure LDAP is working. Do NOT leave this field blank!
5. Under Load Balancing in the NetScaler GUI open the Virtual Servers container. Add a new virtual server and use a logical name such as ldap.contoso.net_389. Change the protocol to TCP, enter the IP address of the new virtual server and use port 389. Click on the Service Groups tab and select the LDAP_389 group.
6. If all goes well you now have a functioning monitor that shows an UP state.
7. Optionally you can now create a DNS entry for the new virtual server, say ldap.contoso.net, so now any devices that need load balanced LDAP services can simply point to this DNS name. Of course if the device doesn’t support DNS you can specify the virtual server IP address. Just like the rationale behind creating ‘servers’ based on DNS entries in the NetScaler, use DNS names when possible to lessen the work required when IP address changes occur.
8. To test out that the new virtual server is actually working, hop on one of your servers that has the ldp.exe tool installed. This is baked in starting with Server 2008 and later. Launch ldp then select connect. Enter the new LDAP DNS name or the virtual server IP address. Next select bind, leave the rest of the options, and click on OK. You should see messages showing the connection was successful.
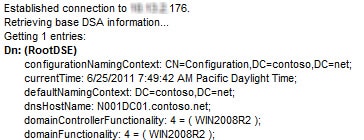
9. If you want to get really geeky and verify that the search LDAP search results for the LDAP monitor are correct you can whip out WireShark and do a network trace. Look for “searchResEntry” to see the results of your query.
And there you have it! Load balanced LDAP! You should now do some testing by bringing down one of the AD servers you are load balancing across then reconnect with the ldp tool and verify you can still connect. As mentioned earlier, if your load balancer supports global load balancing, you can get really fancy and have geographically redundant LDAP. LDAPsoft also has a nifty LDAP browser you can use free for 15 days that is worthwhile to check out if you are a LDAP geek.


Derek, Thanks for your Netscaler guides… they are helping me out. However I am stuck on this one.
How do you go from adding a monitor “ldap_389” to creating a vserver with “ldap_389” as a service group.
I created the monitor, but after that point I am stuck, as it does not show up as a service when adding a vserver.
Thanks again!
Great Article. We are thinking about setting this up in our domain. Do you set any persistence on your ldap vserver? Thank You
@Anonymous #1: You have to create a service group where you combine Server+Port+Monitor.
@Anonymous #2: LDAP doesn’t need persistence, at least not for regular authentication, for more complex tasks I’m not sure.
I was able to get standard ldap (389) working without the monitors. Did you by chance try the ldaps without them? I am seeing an issue right now with secure LDAP but I’m not using monitors…. that said I’m wondering if it’s a crypto thing where the NS appliance needs a key from one of the DC’s.
Ok….Is there a way to forward to multiple domain controllers (in different domains) in succession until one of them replies with anything other than a “User not found” response?