In any enterprise environment, small or large, you should always used trusted SSL certificates for your VMware components. Very commonly people want to use a Microsoft Certificate Authority (CA). But, VMware requires certain properties be present in the SSL certificate to properly function. So you need to create a custom VMware certificate template in your CA to accommodate the key requirements.
You will need to modify the default Microsoft CA Web Server template settings to meet published VMware certificate requirements. vSphere 5.0 and earlier had an additional certificate requirement (nonrepudiation) that is not required in vSphere 5.1. This article will show you how to create a Microsoft CA template with all the past and present requirements, so that your bases are covered.
The default Web Server certificate template it does NOT have Data Encipherment, nonrepudiation, or client authentication enabled. Depending on the version of vSphere you are using, one or more of these properties may be required. So while the CA will happily issue you a certificate if you request these features, it will silently ignore the unsupported key usage specified in your CSR, which may cause you problems.
These instructions are based on Windows Server 2012, but all the options are available in prior Enterprise versions of the OS, such as Windows Server 2008 R2. You may have problems with “standard” edition CAs prior to Windows Server 2012, as they lack some certificate features found in Enterprise or higher editions. Windows Server 2012 standard edition has the full compliment of certificate options, so datacenter edition is not required (there is no enterprise edition).
If you are interested in the full 15-part vCenter 5.1 installation series with trusted SSL certificates, click here.
VMware Certificate Template Creation
1. Open the Certificate Authority tool. Locate the top Certificate Templates, right click, and select Manage.
2. Locate the web server template and duplicate it.
3. Don’t change any of the compatibility settings. Leave it on Windows Server 2003.
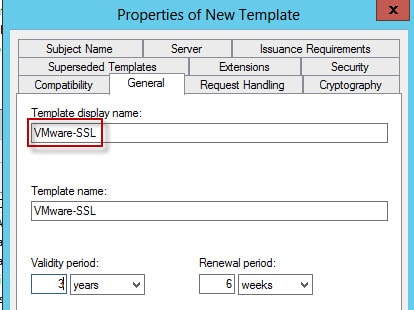
4. Since this template will be used for VMware SSL certificates I named the new template appropriately. I also changed the validity period to three years, but the period the certificate is actually issued with depends on other CA properties so it may not be the full period you specify here.
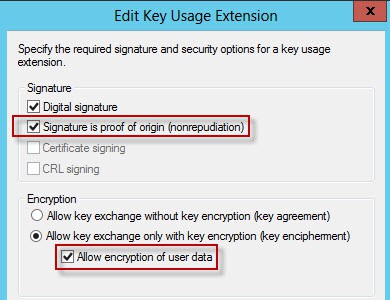
5. Open the Extensions tab, click on Key Usage, then select Signature is proof of origin and Allow Encryption of User data. Note: ESXi 5.1 does not require nonrepudiation or dataencipherment (encryption of user data). But I’ve enabled them here for backwards compatibility.
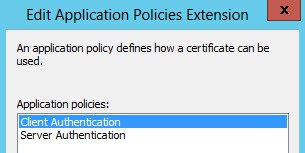
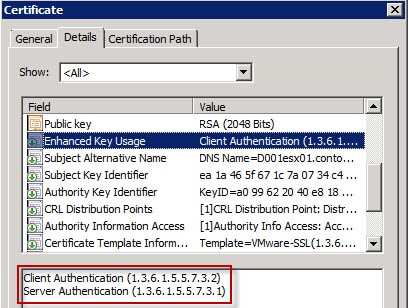
6. In the Extensions tab click Application Policies then click Edit. Add the Client Authentication policy. Note: The vCenter 5.1 services do not require the Client Authentication option, but I’ve included it here for backwards compatibility with vCenter 5.0 and earlier. It appears ESXi 5.1 still wants client authentication.
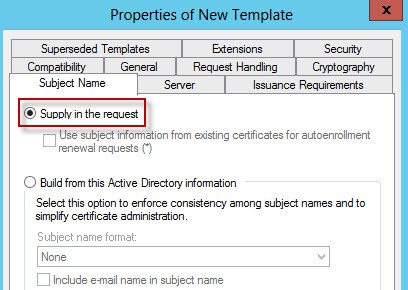
7. On the Subject Name tab make sure Supply in the request is selected (it is by default). This will let us issue certificates with a SAN (subject alternative name).
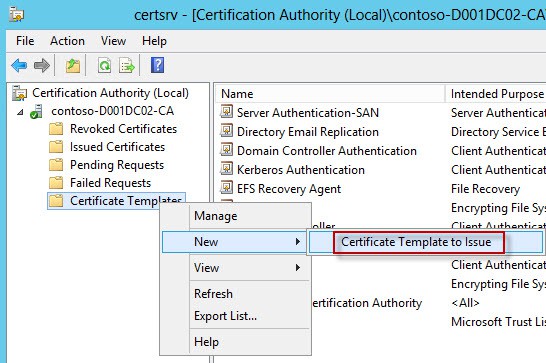
8. After the template is made, you now have to permit certificates to be minted using that template. Right click on the Certificate Templates node as shown below, select New, then Certificate Template to Issue.
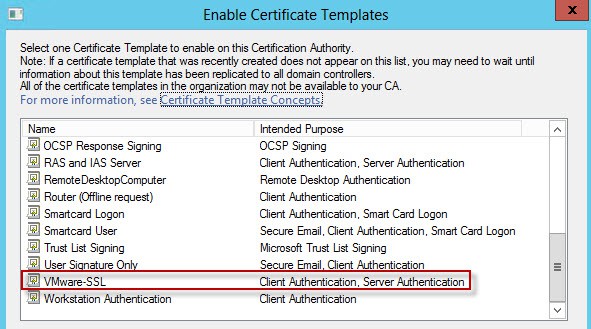
9. Select the VMware SSL template, or whatever name you used.
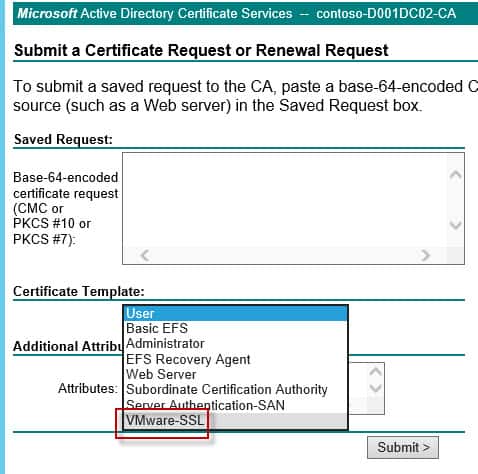
10. If everything went as planned you will have a new certificate template type when submitting a CSR. If you don’t see your new template, you may not have appropriate CA rights to issue the certificate.
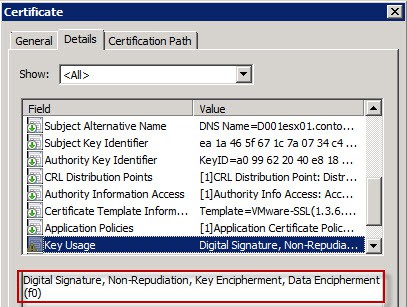
11. To validate everything is working as planned, submit a CSR that has the Data Encipherment, nonrepudiation, and client authentication key requirements, then open the properties of the certificate. As you can see in the screenshots below, our minted certificate has all the required properties. If you have no idea how to create a CSR with these extra usage options, don’t fear, just read my blog post
here. You are now ready to issue the proper SSL certificates for all of your vSphere environments.
Congrats! You now have a VMware certificate template that you can use with all modern versions of vSphere without fear of ignoring an important key usage attribute.


Hi Derek,
1st of all I wanted to thank you for your accurate and detailed blog covering the woe’s that is 5.1. I have upgraded my vCenter & Update Manager with my CA certificates, but only with the excellent help you provided. Just waiting on Synology fixing their NFS issues which Kendrick Coleman blogged about and I can get fully 5.1’d! 🙂
I was wondering if you were planning to do anything on Auto Deploy? I’ve managed to change the CA certificate so the newly deployed nodes take a valid certificate chain but whenever I change the rui.crt & rui.key for the actual server it borks the system. The documentation is extremely light, but I’m sure I’m missing a proper import process like the rest of 5.1.
Keep up the good work, cheers!
Dave
Dave, I still have a few parts left (log browser, VUM) that I need to write up. So those are my first priority. I may get to autodeploy, but I’d just be happy with a rock solid vCenter 5.1 install, which has not yet materialized.
Hi Derek, thank you very much for your detailed blog.
I’m having a problem in step 7 of this article as I can’t see the VMwareSSL template I’ve created.
Hmm…that is odd. Not sure what to say there. Do you have proper permissions?
I had to stop and start the Active Directory Certificate service to see the Template appear.
Thank you again for your blog, very helpful.
In this you have named the template VMware-SSL but in part 2 of your blog posting you have named it VMwareSSL. Nothing insane but I’ve been following step by step and couldn’t work out why I was getting an error
I also had the issue of not seeing the newly created cert in Step 7-8 to “add” it. And, I am indeed on 2K8 Enterprise (R2 SP1, to be exact). I didn’t see it to add in the GUI and thus also didn’t see it in the web interface to check that adding it worked. I tried the certutil cmd, which stated it ran ‘successfully’. I refreshed my CA server web gui and saw the “VMware-SSL” option in the drop-down, but still didn’t see the cert in the GUI (i.e. I again tried to do Rt-click > New > Cert Template to Issue & the “VMware-SSL” cert still doesn’t show in the list. Is it supposed to not show if the cmd runs successfully (or, does it no longer show if it is seen & can be done in the GUI/snap-in)?
Thanks,
Shane
It's awesome post Derek. I just followed all your instructions in combination with VMware notes and managed to install SSL certificates in my environment.
Just to note, I had issue at step 10, i.e. couldn't see certificate template and realised that is due to permissions issue. I have updated following blog post to help if anyone like me struck there.
http://virtualcloudzz.blogspot.com.au/2013/05/can…
Hi, one more suggestion on the certificate template is to enable the private key export option (and then re-start CA). This will allow you to export/backup certificates from the Windows cert store.
That is certainly an option, but could also be a security risk.
Derek – I duplicated the Web Server certificate template and set the validity period higher than 2 years, but the certificate that was issued was only valid for 2 years. You mention in this article that “other CA properties” can change the validity period – can you please specify what those properties are?