This installment in the vSphere 5.1 Update 1 installation series will install VUM (VMware Update Manager) on your system. In Part 10 of this series we configured the VUM DSN in preparation for installing VUM. So now we are ready to deploy VUM. You can co-locate it on your vCenter server in small environments, or have a dedicated VM for medium to large environments.
Before we get started, listed below are the other related articles in this series:
Part 1 (SSO Service)
Part 2 (Create vCenter SSL Certificates)
Part 3 (Install vCenter SSO SSL Certificate)
Part 4 (Install Inventory Service)
Part 5 (Install Inventory Service SSL Certificate)
Part 6 (Create vCenter and VUM Databases)
Part 7 (Install vCenter Server)
Part 8 (Install Web Client)
Part 9 (Optional SSO Configuration)
Part 10 (Create VUM DSN)
Part 12 (VUM SSL Configuration)
Part 13 (VUM Configuration)
Part 14 (Web Client and Log Browser SSL)
Part 15 (ESXi Host SSL Certificate)
Install VUM 5.1 Update 1
1. Start the vSphere Update Manager installation from the vSphere 5.1 main menu.

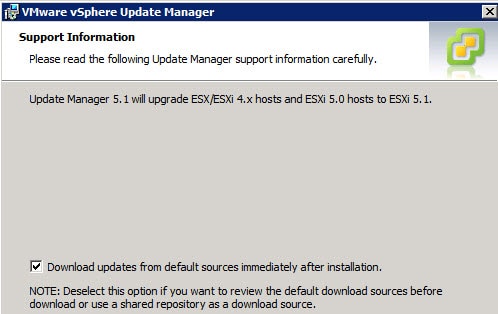
2. Select vSphere Update Manager and click through the wizard until you get to the following screen. If your system is on the internet then leave the box checked, so that you will have all of the latest patches. If you are on a disconnected/secure network, then uncheck the box so it doesn’t try to access the internet.
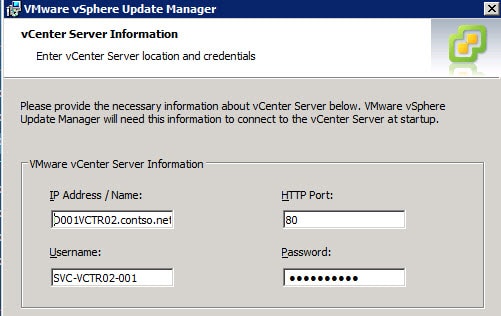
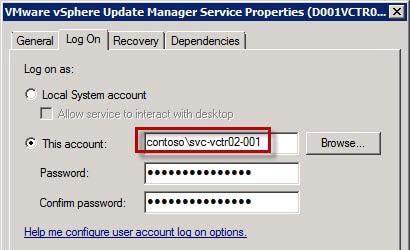
3. On the next screen enter the FDQN of your vCenter server and the username that VUM will use to access vCenter. In this case I just re-used the vCenter service account, since I don’t see a reason to have yet another service account just for VUM. But you certainly could, assuming you gave it appropriate rights in vCenter. Note: If the install hangs at this point, I’ve seen an issue using the FQDN vice the IP address. Should it hang you can kill the process called vciInstallutils.exe and try again with different credentials, hostname, or IP.
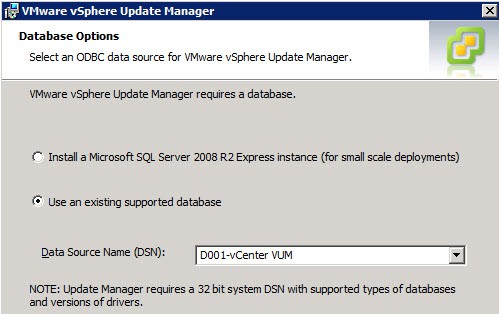
4. If the DSN is properly configured then it should be listed on the next screen.
5. In the drop down change the setting from the IP address to the FQDN.
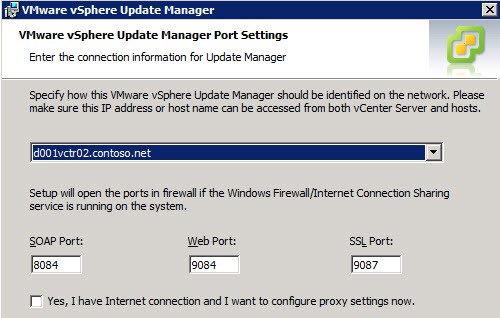
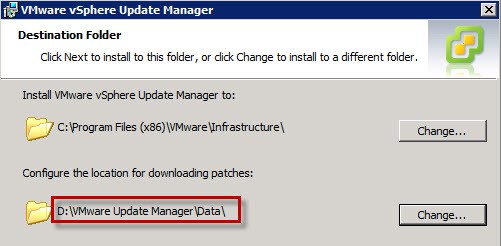
6. I would strongly urge that you use a different drive for the patch repository, as it can get big and you don’t want it filling up your C drive.
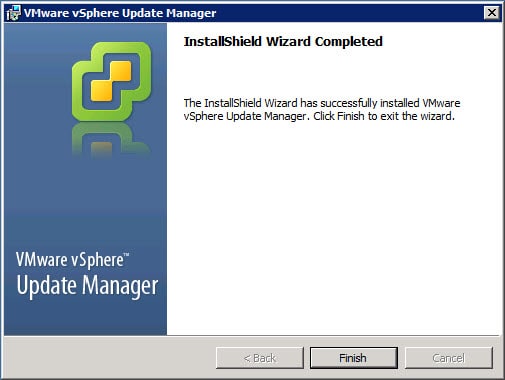
7. Sit back and wait for the installation to complete, which shouldn’t take very long.


I’ve finally gotten to this stage , thanks to this blog!!I have however hit a problem installing (upgrading from 5.0 to 5.1) update manager.It won’t accept any credential in the vCentre Server Location and credentials box.The service account that has been used all along and that has administrator rights in vCentre.
There seemes to be a few other people having this issue – http://communities.vmware.com/thread/418281?tstart=0
I’m about to open a case with vmware for this issue and see what they come back with.I have changed the server details from FQDN to actual IP to 127.0.0.1 and nothing is working.Computer says no or just hangs.
This is a total clusterfu$k by vmware.At a workshop last week where they told us all that it was seamless.I’ll update any developments that come my way.
Conor: According to the above-referenced VMware Community thread the Update Manager installation hangs when third-party or enterprise CA and SSL certificates are installed on the vCenter server. This is the case with us. I did find that the installation succeeded when I changed the FQDN of the vCenter server to 127.0.0.1. We have a small-scale VMware setup, and all the vCenter-related services are running on a single host. Thanks for posting any new information on this. A couple of days ago one of the posters to the community thread said he was opening a tech support case with VMware. Perhaps we will hear the results of that in due time. Thanks. Jeff.
So taht link above to the KB, it seems the best workaround is to point the installer to either “localhost” or some new DNS FQDN for vCenter not tied to the names on the certificate.
ie: cert for vCenter is vcenter.domain.com and vcenter
So create a dns entry for vcenter-nossl.domain.com and tell VUM install to use that entry.
btw, Derek this is an AMAZING series of guides you put up. Thank you x10.
@Jeff: Thanks! I spent a TON of time trying to get everything right, in spite of the lack of VMware documentation at the time I wrote it. Glad it helped you out!
Hey Everyone–What is the recommended practice for selecting the role that your vcenter service account runs under? Does it really need to be an administrator or in this case, would an account with the Register Extension permission be good enough?
Thanks again for the help! This tutorial is amazing! 🙂
To pass step 4) I had to:- Add the vCenter service account to the Administrator role ( Administration > Access > Role Manager ). The “AD-based group” was already there and was added following step 4) & 5) from part 9 of this install series tutorial. With this step I bypassed the error “Setup failed with an unknown error. vCenter credentials could not be validated.” as explained here: <a href="http://www.getshifting.com/wiki/vum51#errorhttp://www.getshifting.com/wiki/vum51#error<br />- Add a new hostname entry in the DNS server that pointed to vCenter IP. With this step I bypassed the “the vcenter server entered is not reachable” screen.
Thanks for the link, that resolved the issue for me. Running VUM on a seperate VM, I made the VUM service account an admin within vCenter as the post suggested
This worked for me on the all-services-on-one box install. Thanks for this… definitely helped big time.
I'm running 5.1U1 on Server 2012 with SQL 2012. Everything worked fine for a day or so, but now I'm getting error message saying "There was an error connecting to VMWare vSphere Update Manager – The request failed due to a connection error."
I've seen a few community posts on this but no one seems to have a good answer. Has anyone else run into this?
PS I did not do any of the SSL cert instructions, only the VMWare install side of things.
In my case, changing the Logon account of the services "VMware vCenter Inventory Service" and "VMware vSphere Profile-Driven Storage Service" to the same Logon account as the two "VMware VirtualCenter …." services solved the problems with validating the credentials while installing VMware Update Manager.