Welcome to the third part in the series for installing and configuring VMware Horizon View 5.2. In Part 1 and Part 2 we performed a basic install of the VMware Horizon View connection server role and setup a trusted SSL certificate. In this installment we will do some basic configuration of a vCenter role, setup a service account, add a license key, and link the Connection server to vCenter.
Additional articles in this series:
VMware Horizon View 5.2 Part 1: Basic Installation
VMware Horizon View 5.2 Part 2: SSL Certificate
VMware Horizon View 5.2 Part 4: VM and Pool Creation
VMware Horizon View 5.2 Initial Configuration
1. Create a domain service account that the View connection server will use to connect to vCenter. On a domain controller create a new AD service account, and set the password to never expire. In my environment the account is called SVC-View01-001. Name is not important, so use whatever naming convention suits you.
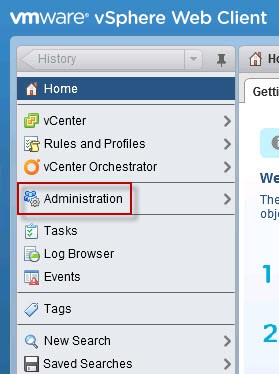
2. Login to the vSphere Web Client and from the Home page click on Administration.
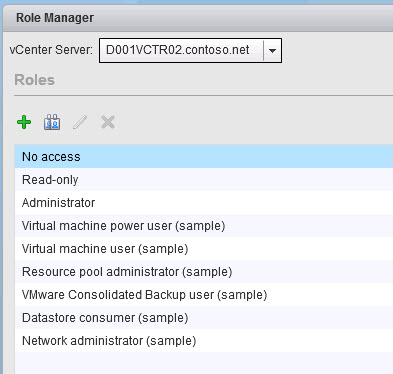
In the Administration page click on Role Manager. Create a new role by clicking on the green plus icon. Call it something like View Administrator.
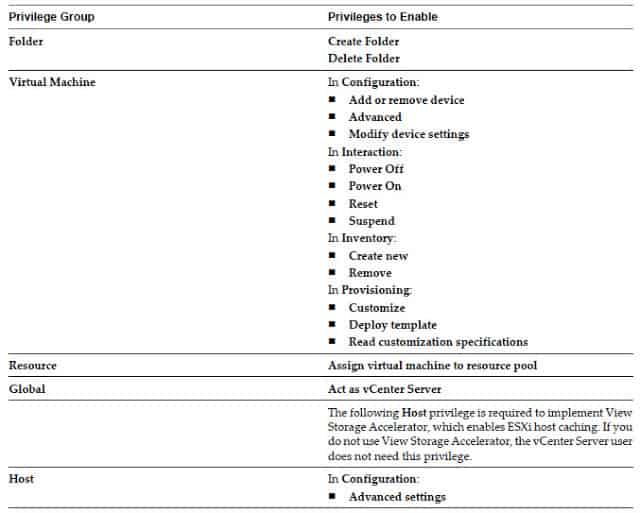
3. Add all of the privileges to the View Administrator role shown in the VMware table below.
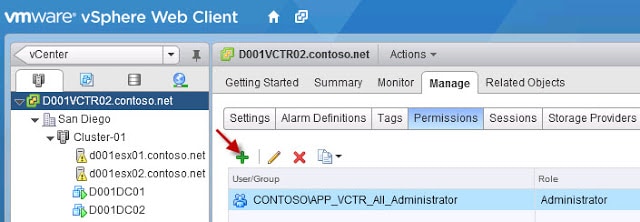
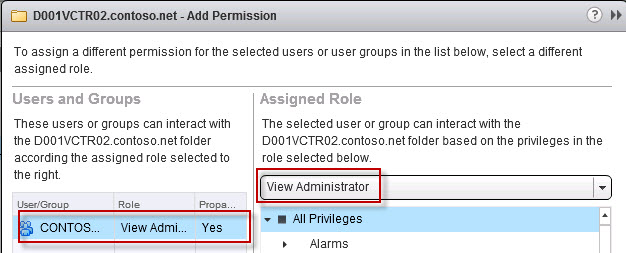
4. In the vSphere Web Client navigate to Home > vCenter > Hosts and Clusters, then click on the vCenter name. Now click on the Manage tab and then the Permission tab. Click on the green plus icon to add a permission.
5. Add the domain service account in the left pane, and change the role to View Administrator in the right pane.
6. Launch the View administrator and in the left pane expand View Configuration. Click on Product Licensing and Usage. Enter your View 5 product license key.
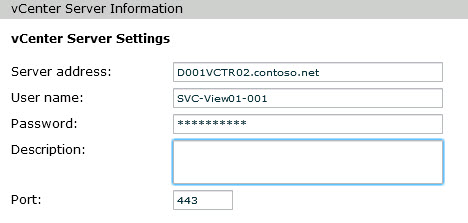
7. Under View Configuration click on Servers. Click on the vCenter Servers tab and click Add. Enter the vCenter’s FQDN, your service account name and password. Review the advanced settings in the lower half of the pane to see if they make sense for your environment. I left the defaults.
8. Since we haven’t yet installed View Composer (optional component), select Do not use View Composer.
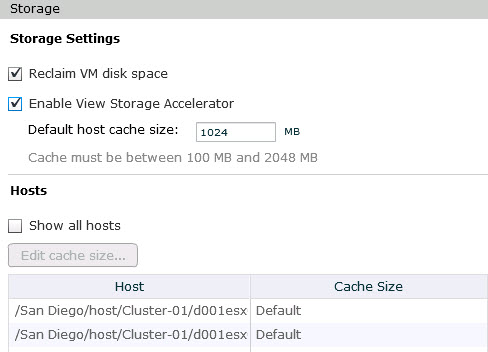
9. If you are using vCenter 5.1 and ESXi 5.1, you will be presented with some new storage settings. I would leave the all the defaults, as those will produce the best results. If you are using a third party VDI storage accelerator such as Atlantis Computing ILIO then I would disable these storage features as they won’t provide much benefit.
10. At this point the vCenter should be successfully added and have green check boxes under all features.
We have now covered the major configuration steps for the View Connection server components. Next up is a little AD work, creating a VM template, and adding a few desktops to the View administrator console. You can check out that installment in Part 4
here.



thnx