Microsoft has been very busy adding new security features to Windows 10. It seems that each release gets something new, or existing features are enhanced. For enterprises, one of the great new-ish features is Windows Defender Credential Guard. What is Credential Guard? It uses VBS (virtualization based security) to help mitigate pass-the-hash or pass-the-ticket attacks. I wrote a how-to blog article many years ago on how one can ‘root’ your Windows 7 PC and ultimately compromise your whole network including domain controllers. It was scary easy. Windows 8 was supposed to make it harder, but Windows 10 with fall creator’s update (1709) has really raised the bar.
But until the release of VMware Workstation 14, you couldn’t easily test these new features in a virtual environment. However, Workstation 14 has explicitly added support for VBS in hardware v14, and the UEFI firmware supports secure boot. This now allows one to test Windows Defender Credential Guard. The whole process is fairly easy. But a few requirements must be met: 1) VMware Workstation 14 (or later) 2) Windows 10 Enterprise edition (no home/pro) 1709 (Fall Creator’s update) 3) Physical host that is modern enough to support virtualization extensions.
Workstation 14 Credential Guard Configuration
Let’s get started with configuring the VM hardware on Workstation 14 to appropriately support VBS and secure boot. I’ll assume you are familiar with Workstation basics. VM size just for basic testing can be 1 vCPU and 2GB of RAM.
- Create a new virtual machine using the custom (advanced) wizard.
- Select hardware compatibility: Workstation 14.x
- Select ‘I will install the operating system later’
- Select ‘Microsoft Windows 10 x64’ guest operating system
- Select a VM name and location that you desire
- Select UEFI and secure boot firmware type
- Choose your processors/core that you desire
- Choose the memory configuration you desire
- Choose the network connection type you desire
- Leave the SCSI controller type and virtual disk type
- Create a new virtual disk
- Allocate sufficient storage and split as needed
- Chose a disk file name that you desire
- Click Finish
- Edit the VM settings and click on the Options tab
- Click on Advanced and check the box next to Enable VBS
Now that your VM hardware is properly configured, next, install Windows 10 Enterprise Edition 1709. I won’t go through that process, as there’s nothing special to do until it’s fully installed and you have a desktop. Once you have a desktop, come back to this post and resume the configuration. Be sure to grab the latest VMware tools, which has updates for Windows 10 Fall creator’s update, here.
Windows 10 Credential Guard Configuration
1. Press the Windows key and type system information.
2. Scroll down on the summary page and look at Virtualization-based security. It should show not enabled.
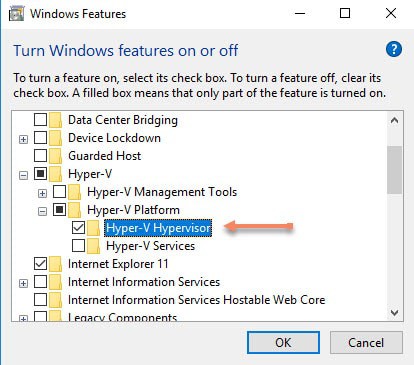
3. Press the Windows key and type features.
4. Scroll down to Hyper-V, Hyper-V Platform, and check Hyper-V Hypervisor.
5. Wait for the feature to be added, but do NOT reboot.
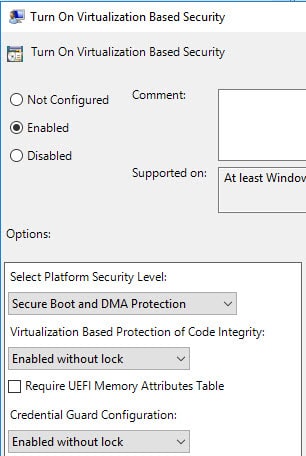
6. Open gpedit.msc. Navigate to Computer Configuration, Administrative Templates, System, Device Guard.
7. Enable the Turn on Virtualization Based Security policy.
8. Select the options below, or enable UEFI lock for a production environment to prevent remote manipulation of these settings. You can also turn on the UEFI memory attributes table if you wish.
 9. Close gpedit and do a gpupdate /force from the command line.
10. Restart the VM. Open System Information and on the summary page scroll down to the very bottom. Verify virtualization-based security is running.
Summary
As you can see from this post, enabling Windows Defender Credential Guard is pretty easy. Workstation 14 supports it out of the box. VBS is a new feature of Hardware Version 14, which vSphere 6.5 does not support. So any support for VBS would come in a future vSphere update. Workstation often foreshadows upcoming vSphere features, so I wouldn’t be surprised to see it in the next version.


