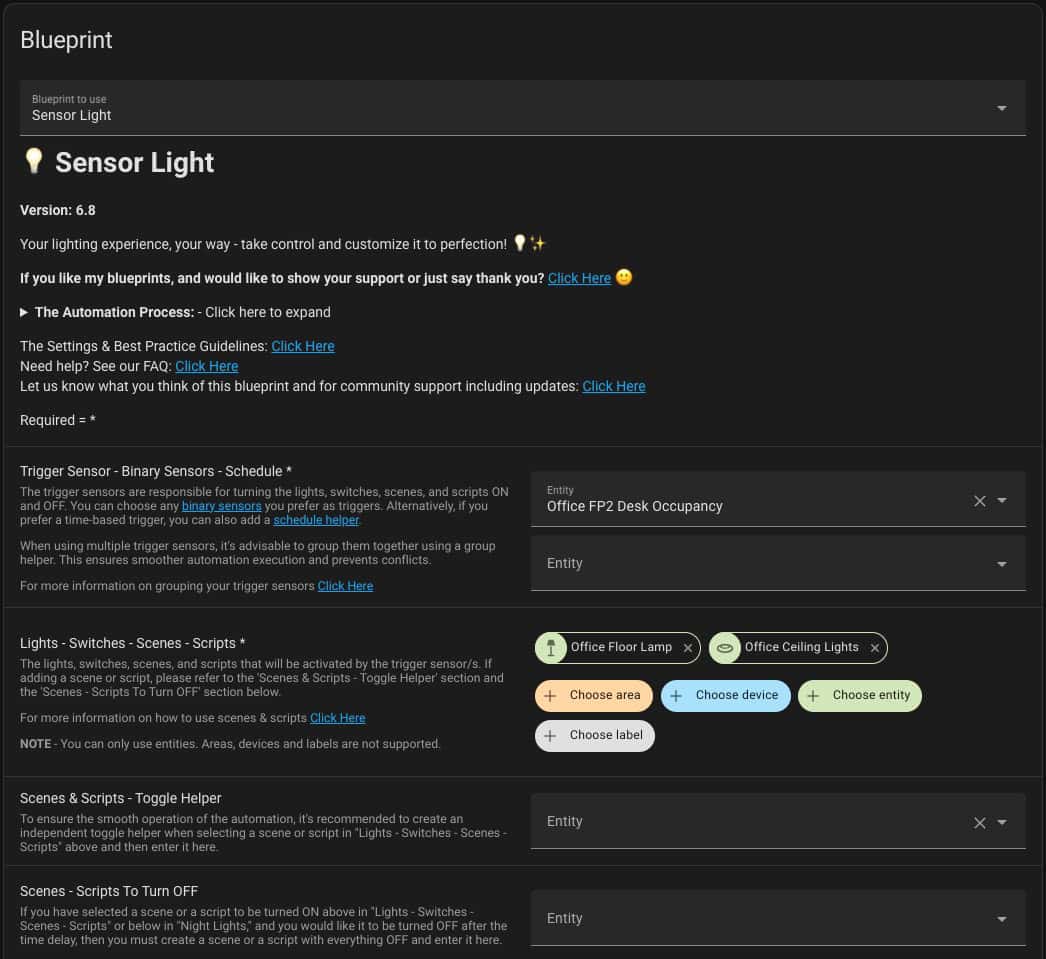
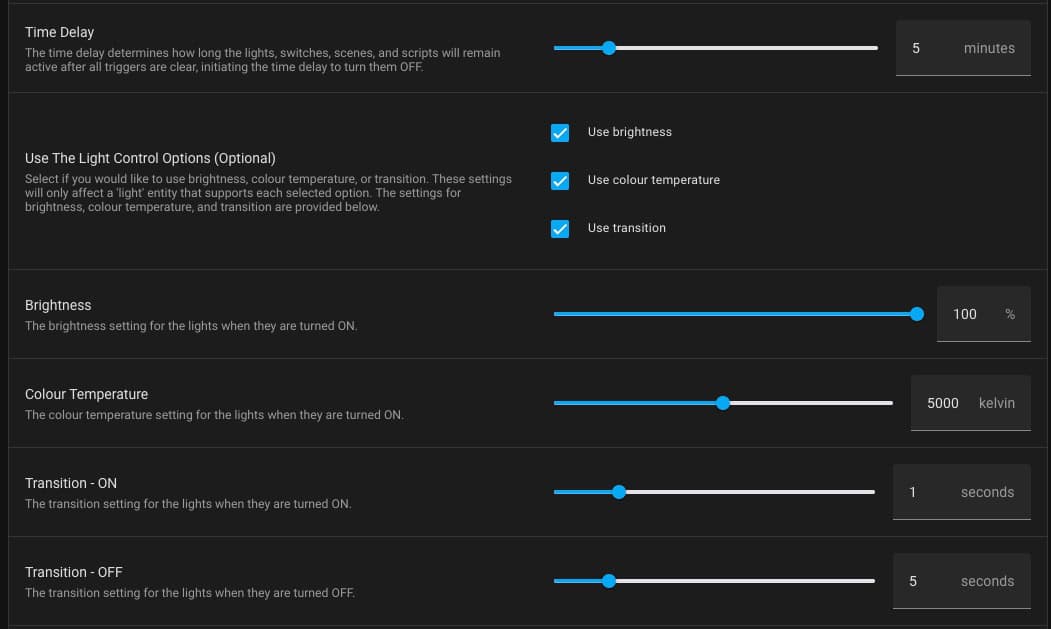
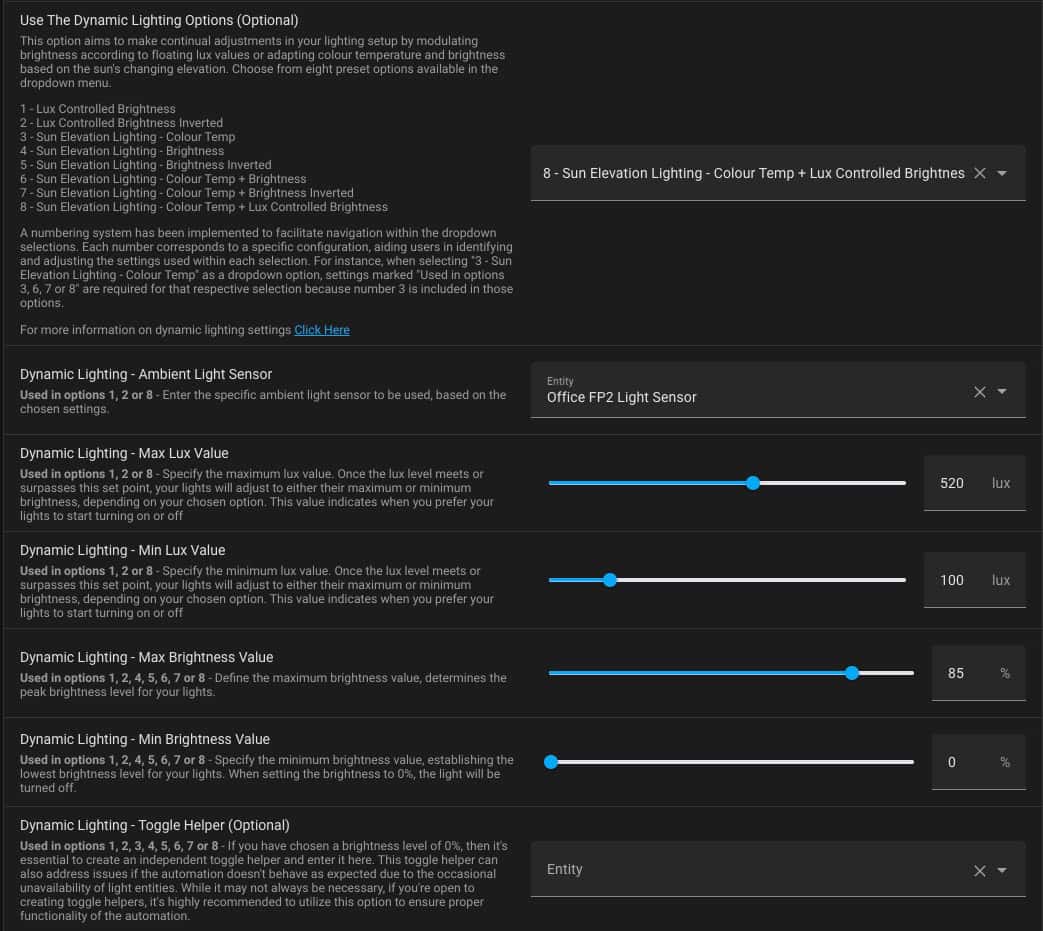
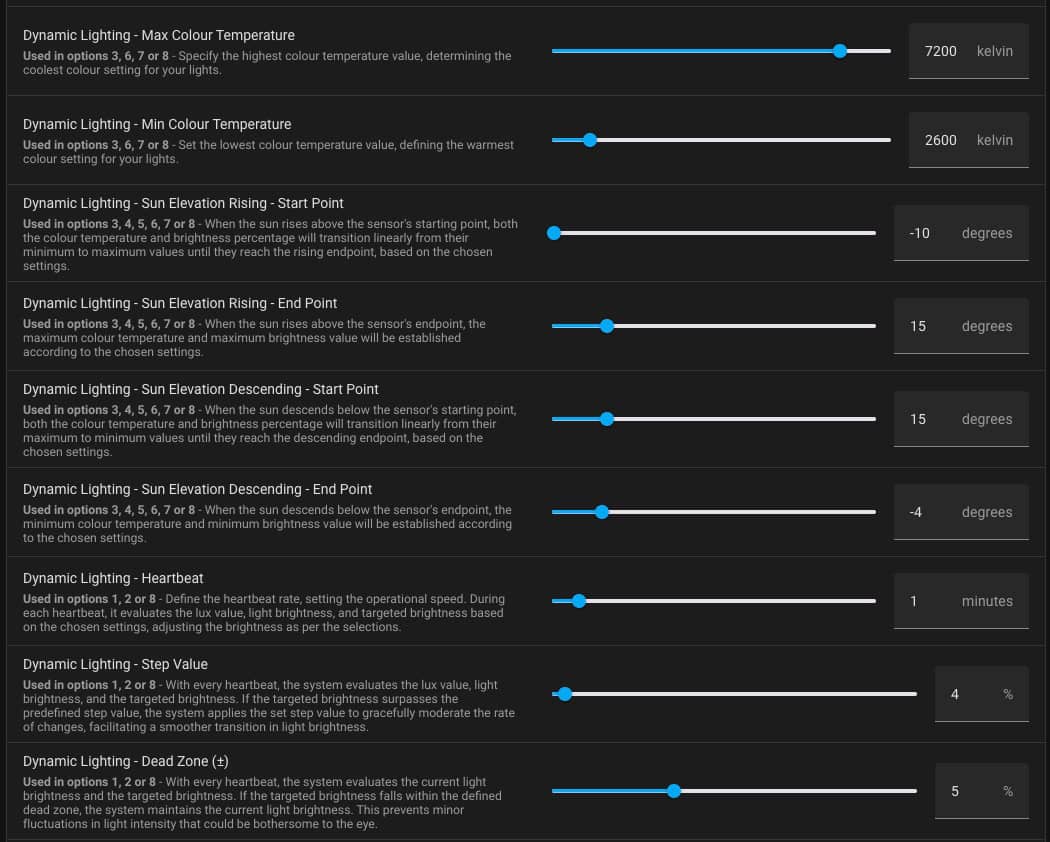
Home Assistant: The Ultimate Light Automation Blueprints

One of the most common automations that people use probably use Home Assistant for is lighting. Several months ago I stumbled on an amazing collection of Home Assistant blueprints by community member Blacky (Craig Black). They do more with light automation than I ever thought possible. The best part is that his blueprints are free (but do support him with a donation), and entirely configured via a nice GUI. No YAML or Node Red is needed! 

At first you might think lighting automation is easy…maybe it’s just motion based, turns on/off with a fixed schedule, or simply based on sunrise/sunset time. However, setting up even moderately advanced lighting automations can be tricky and error prone. This is where several of Blacky’s Home Assistant blueprints come to the rescue and might even blow your mind. No kidding.

Disclaimer: I have no relationship with Blacky and he didn’t ask me write this post. I’m just an exceptionally happy consumer of his work and wanted to share his wonderful work with a broad audience. Community members like Blacky are what makes Home Assistant so great!

Blacky's Home Assistant Blueprints

Blacky is a prolific Home Assistant blueprint author. I really have no idea when he sleeps, as he frequently updates his blueprints based on user feedback or adding new features. As of the publication date of this post here is his current list of blueprints: 

This post will just cover his “Sensor Light” Blueprint, as it’s the one I use the most and has more options than you can imagine. This post is not here to explain how all of the options work, as he has great documentation and FAQ resources for that. But I wanted to introduce you to his amazing work and walk you through v6.8 of his Sensor Light blueprint. No doubt in a few weeks he will have a new version out with even more features or bug fixes based on community input. 

One great feature of using Home Assistant Blueprints is that you can update the ‘master’ copy with just one click, and then all of the individual automations you’ve created using his template are instantly upgraded to the new version. I have over a dozen light automations using his blueprint so a one click update for all automations is fantastic.

Blacky's Sensor Light Blueprint

The remainder of this post is mostly screenshots of the huge number of configuration options in v6.8 along with some of my own commentary. Click on each graphic to enlarge it. For this example I’m using one of my home office light automations. You can check out his Home Assistant Sensor Light community post for all the details, FAQ, and more. 

Triggers, Scenes, and Initial Settings

The first configuration option is the trigger sensor. This is what will turn on your lights. You can use a binary sensor like a motion/presence sensor, or a schedule helper for time-based triggers. In my case I use the Aqara FP2 presence sensor, which is a binary sensor. I have a presence zone setup for my desk chair, which works very well. 

Next up are the lights, scenes, or scripts that you want to turn on when triggered. Here, the blueprint will turn on my Hue floor lamp and recessed lights. I’m not using scenes or scripts, so I left those blank. Using scenes and scripts allows you to get very creative with custom lighting needs.  

Next you can configure the time delay which controls how long the lights, scenes, or scripts will remain active after they are triggered. My Aqara FP2 is amazing at detecting my presence at my desk, so I never have to waive my hands or move to keep the lights on. Because of this, I can set a short timeout of 5 minutes. I’m big on energy conservation, so why have the lights on in a space that I’m not occupying?

When the lights are initially turned on you can optionally have the blueprint set the light’s brightness, color temp and on/off transition time. I like the lights to come on instantly, but fade to off over 5 seconds. I think it looks a bit more ‘premium’ than a light instantly turning off.

Dynamic Lighting

One of the most amazing aspects of Blacky’s blueprint is the dynamic lighting section. He provides eight different control ‘modes’, depending on what you are trying to accomplish. It’s out of scope of this post to describe each one, but he has great documentation you can review for all the details.

For my office lights I use option 8, which is one of the most complicated under the hood, but easy to setup and tweak. Option 8 uses sun elevation to control when the lights turn on/off, varies the color temp throughout the day (adaptive lighting), and uses the Aqara FP2 light sensor to adjust the light brightness in real time. Pretty sweet!

1 – Lux Controlled Brightness
2 – Lux Controlled Brightness Inverted
3 – Sun Elevation Lighting – Colour Temp
4 – Sun Elevation Lighting – Brightness
5 – Sun Elevation Lighting – Brightness Inverted
6 – Sun Elevation Lighting – Colour Temp + Brightness
7 – Sun Elevation Lighting – Colour Temp + Brightness Inverted
8 – Sun Elevation Lighting – Colour Temp + Lux Controlled Brightness

The biggest section of his blueprint is dedicated to dynamic lighting settings. The sky is really the limit on how you can customize light behavior. He allows you to customize the brightness (LUX) response, sun elevation start/stop points, heartbeat, step values, dead zone, and more. 

Bypass Options

Next up in Blacky’s blueprint are bypass options. Think of a bypass as a way to override what happens to your lights and the automation. For example, you could have a ‘party mode’ bypass which keeps the lights on, or a ‘Halloween mode’ which keeps the lights off. He also includes an auto off option which forcibly turns the lights on or off after a set period of time. You can get really creative with this, if you wish. 

Sun Position and Ambient Lighting Options

Blacky also lets you control the lights with customizable sun positions for both sunrise and sunset. In addition, he has a number of ambient light settings. Here, I use the LUX sensor in my Aqara FP2 to adjust if my lights are on or off (and the dimming level) based on how bright it is in the room. No need to have the ceiling or floor lights on when it’s sunny outside. 

Time Options

In case you only want the automation to run on certain days of the week or during specific time periods, you can also customize that. I want the automation to run 24/7 so I disabled the feature.

Device Tracker Option

If you want the blueprint behavior to depend on people or a specific person being home, you can easily set that up as well. 

Night Lights (Part 1)

Another super cool feature of this blueprint are the deep night light customization options. Next to the dynamic lighting customizations, night light settings are not far behind in terms of the breadth of available settings. Here you can use different scenes, scripts, time delays, brightness and color settings, and much more which trigger at night time. 

Why is this cool? Maybe you have this blueprint controlling your bedroom and bathroom lights. But at night, say past 10PM, you don’t want to be blinded if you need to use the loo in the middle of the night. You could define the night lights and maybe just turn on one light to 5%, and have it quickly turn off when no motion is detected. 

Night Lights (Part 2)

Finally, for the night lights you can control what happens when crossing over from daytime to night time (and back), setup a trigger to turn the night lights on, set the start/stop time of night lights, and even control night lights by the sun’s elevation. Again, you can get really creative here. 

If that wasn't enough...

Blacky also has a companion blueprint called “Sensor Light Add On – Media & Movie Lights – House Alarm Lights – Smoke Alarm Lights & Exhaust Fans + More.” I use this blueprint in my home theater room, in conjunction with his main sensor light blueprint. This add-on script can interface with your media player (like Apple TV or nVidia Shield), and change your lights/scenes based on what app you open (e.g. Netflix or Apple Music), are taking an intermission (turn the lights up), or more.  

Summary

The Home Assistant community user Blacky has pumped out over a dozen super high quality FREE blueprints. Blacky is highly receptive to user input, fixing bugs, and listening to the community for new ideas. In this post I quickly covered his Sensor Light blueprint. As you saw, he’s covered a huge number of lighting scenarios and conditions which you can configure with a few clicks of the mouse. And if past performance is any indication of future performance, you can expect new versions of his blueprints every few weeks. Want a new feature or use case? Blacky is all ears and there’s a good chance your idea could make it into a future blueprint version. I’ve made several suggestions which Blacky incorporated into his blueprints. 

If you find any of his blueprints helpful, I would strongly urge you support him. I’ve personally donated several times when he came out with new scripts or major updates. He’s rumored to be working on an advanced window covering blueprint that I can’t wait to try. If you are a Home Assistant user, Blacky’s scripts are worth checking out. Be sure to check out his other blueprints that can control exhaust fans, do calendar based notifications, notifications, and much more!

Print Friendly, PDF & Email

Related Posts

Subscribe
Notify of
0 Comments
Inline Feedbacks
View all comments