A couple of months ago I successfully defended my Nutanix Platform Expert (NPX) certification and became number 14 in the world to obtain the certification. You can read all about that journey here. As part of the NPX certification process you submit a documentation package which should cover all of the areas in the NPX blueprint. This package will consist of multiple documents, but it's entirely up to the author on how to organize and present the content called out in the blueprint. This post is part 1 of a 2 part series, covering how my NPX architecture guide was organized.
There is no "NPX" document template or "magical" format that will guarantee acceptance of your work, and enable you to do the in-person live defense. So please don't just copy this outline as-is, throw in a few sentences under each topic, and think you are good to go. Just use these two posts as inspiration for your NPX submission, and help ensure you cover all blueprint areas.
Straight from the NPX Design Review blueprint your documentation package must include the following content, or the submission will be rejected:
- A current state and operational readiness assessment
- A web-scale migration and transition plan
- Documentation of specific business requirements driving the solution design
- Documentation of assumptions that impacted the solution design
- Documentation of the design constraints that impacted the design and delivery of the solution
- Documentation describing risks identified in the design and delivery of the solution and how those risks were remediated
- A solution architecture including conceptual/logical and physical design with appropriate diagrams and descriptions of all functional components of the solution
- An implementation plan
- An installation guide
- A test and validation plan
- Documentation of operational procedures
And also directly from the NPX blueprint, the following categories will be judged:
Conceptual/Logical Design Elements
- Scalability
- Resiliency
- Performance
- Manageability and control plane architecture
- Data protection and recoverability
- Compliance and security
- Virtual machine design logical design
- Virtual network design
- Third-party solution integration
Physical Design Elements
- Resource sizing
- Storage infrastructure
- Platform selection
- Networking infrastructure
- Virtual machine physical design
- Management component design
- Datacenter infrastructure (Environmental and power)
As you can see, the NPX blueprint covers a lot of ground. Although page content is NOT specified, and longer is NOT always better, typical submissions can exceed 200 total pages (spread across multiple documents).
Where to Start
One of the first tasks when you are starting down the NPX path is to plan out your documentation, and decide what NPX blueprint content will be in what documentation. Again, there's no hard and fast rule here. And as an "X" (expert) level architect, you should have a good idea how to do this. Logical organization is KEY to allowing the NPX panelists to quickly and properly evaluate your documentation. If it's hard to find the blueprint areas for scoring purposes, you are not doing yourself any favors. Make it dead easy find each and every required documentation criteria.
For my joint submission with my NPX partner Bruno Sousa, we decided on the following physical documents (in no particular order):
- Completed NPX application PDF form
- Resume
- DevOps essay
- Architecture Design Guide
- Implementation Plan
- Installation Guide
- Operational Vertification
- Operations Guide
In this blog post I will focus on the Architecture Design Guide, as that is where the majority of the content lives. That's not to discount all of the other docs, but time wise, I found myself spending the most on the Architecture Guide.
NPX Architecture Guide
As can see from the NPX blueprint, you are required to have conceptual, logical and physical elements to many design areas (virtual machines, networking, etc.). A natural progression from conceptual, logical and physical in your documentation makes following your thought process easy. As you will see from my documentation outline, for most areas I made specific headings called "Conceptual Design", "Logical Design" and "Physical Design". That makes it super obvious that 1) You've covered the areas in the NPX blueprint 2) You know the difference between each 3) Allows the reader to logically follow your thought process. A simple but key tip. I've seen more than one NPX submission that made it very difficult to follow the author's thought process.
With all of that being said, now let's dive into the actual outline of my NPX Architecture Guide so you can see how it was organized. Again, this is not the magical outline, and you can diverge from this to suit your style and design. This is just how Bruno and I organized the document.
The major sections in our architecture guide are:
- Overview
- Current State and Operational Assessment
- Design Overview
- Nutanix Capacity and Sizing
- Nutanix Cluster Design
- Host Design
- Network Design
- Storage Design
- Security and Compliance
- Management Components
- Virtual Machine Design
- Data Protection and Recoverability
- Datacenter Infrastructure
- Third-Party Integration
The remainder of this blog post will touch on highlights from each area, and have screenshots of the actual outline from our submission.
1.0 Overview
The overview is a very brief 3-4 page description of the entire solution, at a 30,000 foot level. Why was this project needed? What are the roles and responsibilities of all parties involved (hint: use a RACI chart)? What was the customer project sign off process?
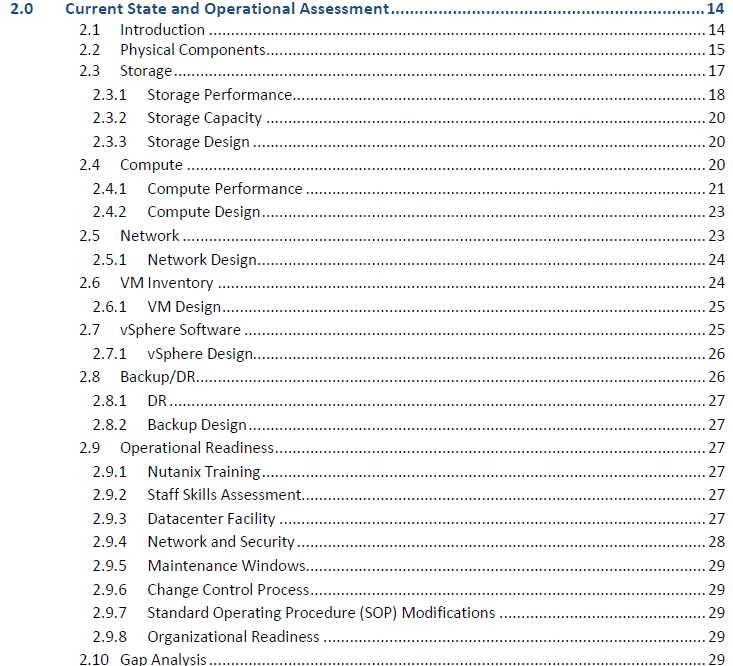
2.0 Current State and Operational Assessment

If you are in a brownfield environment and are doing any type of upgrades, migration, etc. you will need a current state and operational assessment section. As you can see from the outline above, it needs to be very comprehensive. For example, I included the following:
- Performance baseline (storage, compute) - Charts, graphs, and IOPS/bandwidth measurements
- Full VM inventory (OSes, largest VM, high performance VM metrics, etc.)
- Full operational readiness assessment
- Gap analysis
Giving the reader a good picture of the current state environment is key, as the remainder of the document will build upon this foundation. Capturing performance metrics is key, so that you know how to properly size the new environment, and then validate the new environment can support the projected workload.
3.0 Design Overview

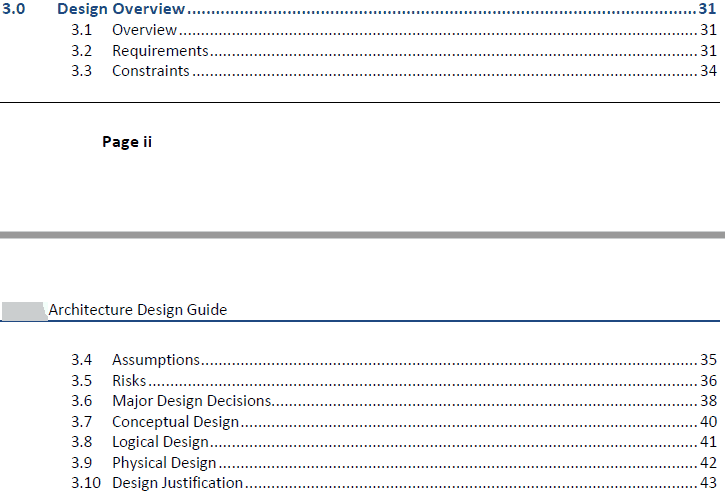
The design overview is massively important, as this section captures requirements, constraints, assumptions, risks, and design decisions. And it also has 10,000 foot conceptual, logical and physical diagrams of the proposed solution.
Each requirement, constraint, assumption, risk and design decision should have a unique reference number, which will be used throughout your entire documentation package. Tip: If you have requirement R10 (for example) in the table, but don't reference it anywhere in your doc package, that's a big problem. Validate each and every item that has a unique identifier is used at least once elsewhere.
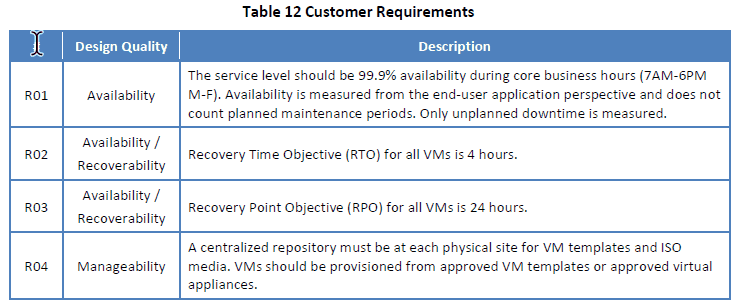
The screenshot below is a small sample of what my requirements table looked like. The number of requirements will vary greatly from design to design. In my case I had 22, but you may have dozens more if the solution is complex.
I have seen candidates break out 'technical requirements' (TR) and 'business requirements' (BR) into separate tables. That's certainly a valid approach, and makes perfect sense. I combined all of mine in one table.

For your risks table, it's not adequate to just list the risk. You must also have a mitigation for each and every risk.
4.0 Nutanix Sizing and Capacity

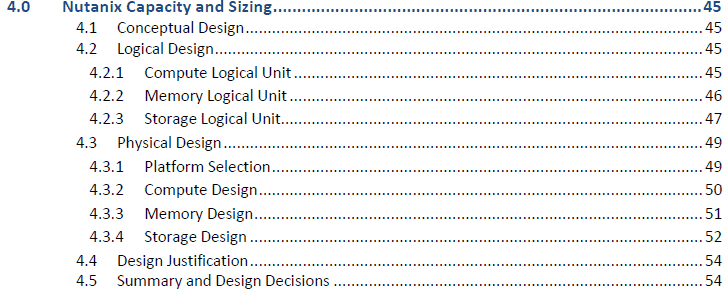
As previously covered, you can see here that I used specific headings of "Conceptual Design", "Logical Design" and "Physical Design" for the sizing and capacity section. This forces you to think and present logically your solution.
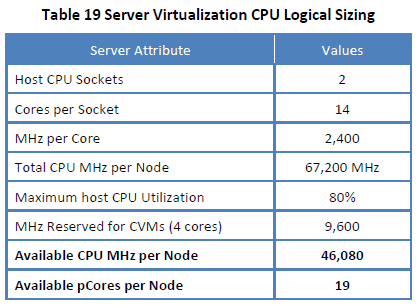
For each logical sizing unit (compute, memory, storage) I had a table similar to the following, which clearly shows my assumptions and how I arrived at the logical sizing unit. This logical sizing unit is then used later for the physical sizing of the cluster.

5.0 Nutanix Cluster Design

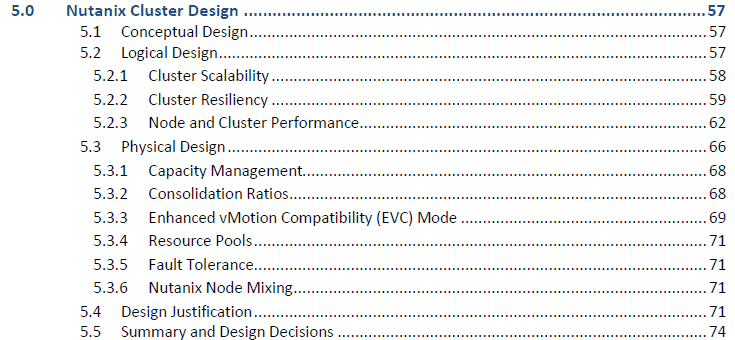
I'll get tired of saying this, but for the Nutanix Cluster Design I also followed the conceptual, logical and physical flow. Key areas to cover here are scalability and resiliency, in addition to all of the physical components.
6.0 Host Design

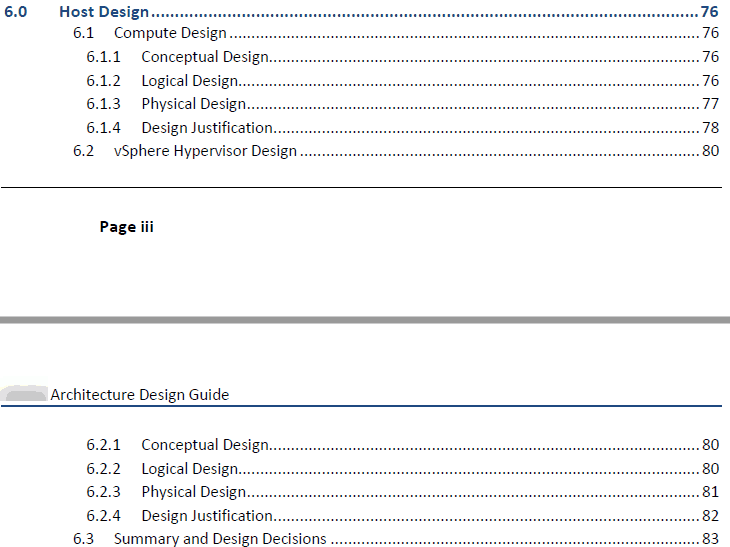
Host design covers the compute design plus the hypervisor of your choice. And again, I used the progression of conceptual, logical, and physical to enable the reader to understand my thought process.
7.0 Network Design

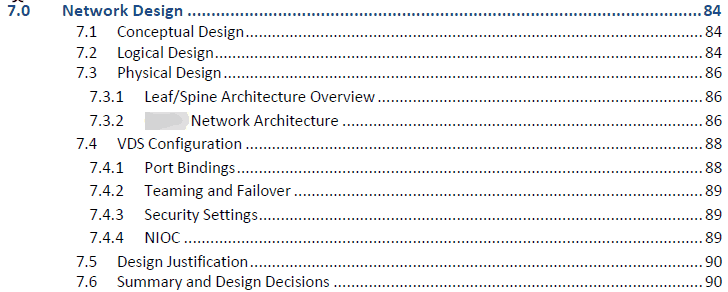
The networking section is pretty self explanatory. You need to have sufficient depth here that you convey your "X" level knowledge of networking. For example, are you using ECMP? Why or why not? Where in the network is routing taking place? What routing protocol? Are you using leaf/spine or a 3-tier design? Microsegmentation? Any SDN solutions? LACP? NIC teaming? NIOC? How many network ports does your solution require? How many free ports are there for future expansion? How would the network scale out as more nodes are added? What's your network security look like?
Networking is often a weak point for architects, so if that is your situation, I suggest seeking out experts to help with your design. For example, do you know any CCIEs? Or is there a networking best practices author within your organization? If you just brush over key network details in your documentation, don't be surprised if during your defense you get quizzed more. So be prepared!
8.0 Storage Design

Just like networking, the storage section is pretty straight forward. Conceptual, logical and physical headings make another appearance. Be sure to cover all Nutanix storage details here, such as compression, dedupe, EC-X, data locality, shadow clones (if used), RF-level, etc.
Summary
As you can see from the first eight sections of the NPX Architecture Guide, there are a ton of details that you need to cover. It took me over 96 pages to cover these eight sections in what I thought was sufficient "X"-level detail. In Part 2 of this series, I will cover sections 9 - 14, and give you more tips about what I included in each section.


